
MongoDB Atlas
For the following steps, you must have access to a MongoDB Atlas instance and be able to manage Custom Roles and Database Users within it.
If you do not have access, please invite your MongoDB Atlas administrator to Rockset.
Create a MongoDB Atlas Integration
A MongoDB integration can provide access to one or more MongoDB collections across different databases in the same MongoDB Atlas cluster. You can use an integration to create Rockset collections that continuously sync data from your MongoDB Atlas collections. You can authenticate to MongoDB Atlas using MongoDB SCRAM Authentication or MongoDB X.509 Authentication.
If you are using X.509 authentication, there are two possible flows for creating your integration, depending on your setup:
- Using MongoDB Atlas certificate authorities for signing client and server certificates
- Using private/self-managed certificate authorities for signing client certificates only; MongoDB Atlas servers use certificates signed by public certificate authorities
Create a MongoDB Atlas Integration using SCRAM authentication
Step 1: Configure MongoDB Atlas Custom Role
- Navigate to "Database Access" (from left navigation) in your MongoDB Atlas account for the
cluster you want to connect to Rockset. - Create a new custom role by navigating to "Custom Roles" and clicking "Add New Custom Role".
If you already have a role set up for Rockset, you may update that existing role.
For more details, refer to MongoDB Atlas documentation on Custom Roles.

- Set up read-only access to your MongoDB collection. Add the following Actions or roles:
find,changeStream,collStatsand also enter the names of databases as well as collections for each of these actions or roles. You can update access to databases and collections in Mongo UI at any time without changes required in Rockset integration. The same integration can be used to create more Rockset collections based on permissions.

- Save the newly created or updated custom role and give it a descriptive name. You will attach this custom role to a new or existing Atlas user.
Why these permissions?
find- Required for initial collection scan when reading data.changeStream- Required for retrieving records from MongoDB Atlas Change Streams.collStats- Required for metadata about MongoDB Atlas collections.
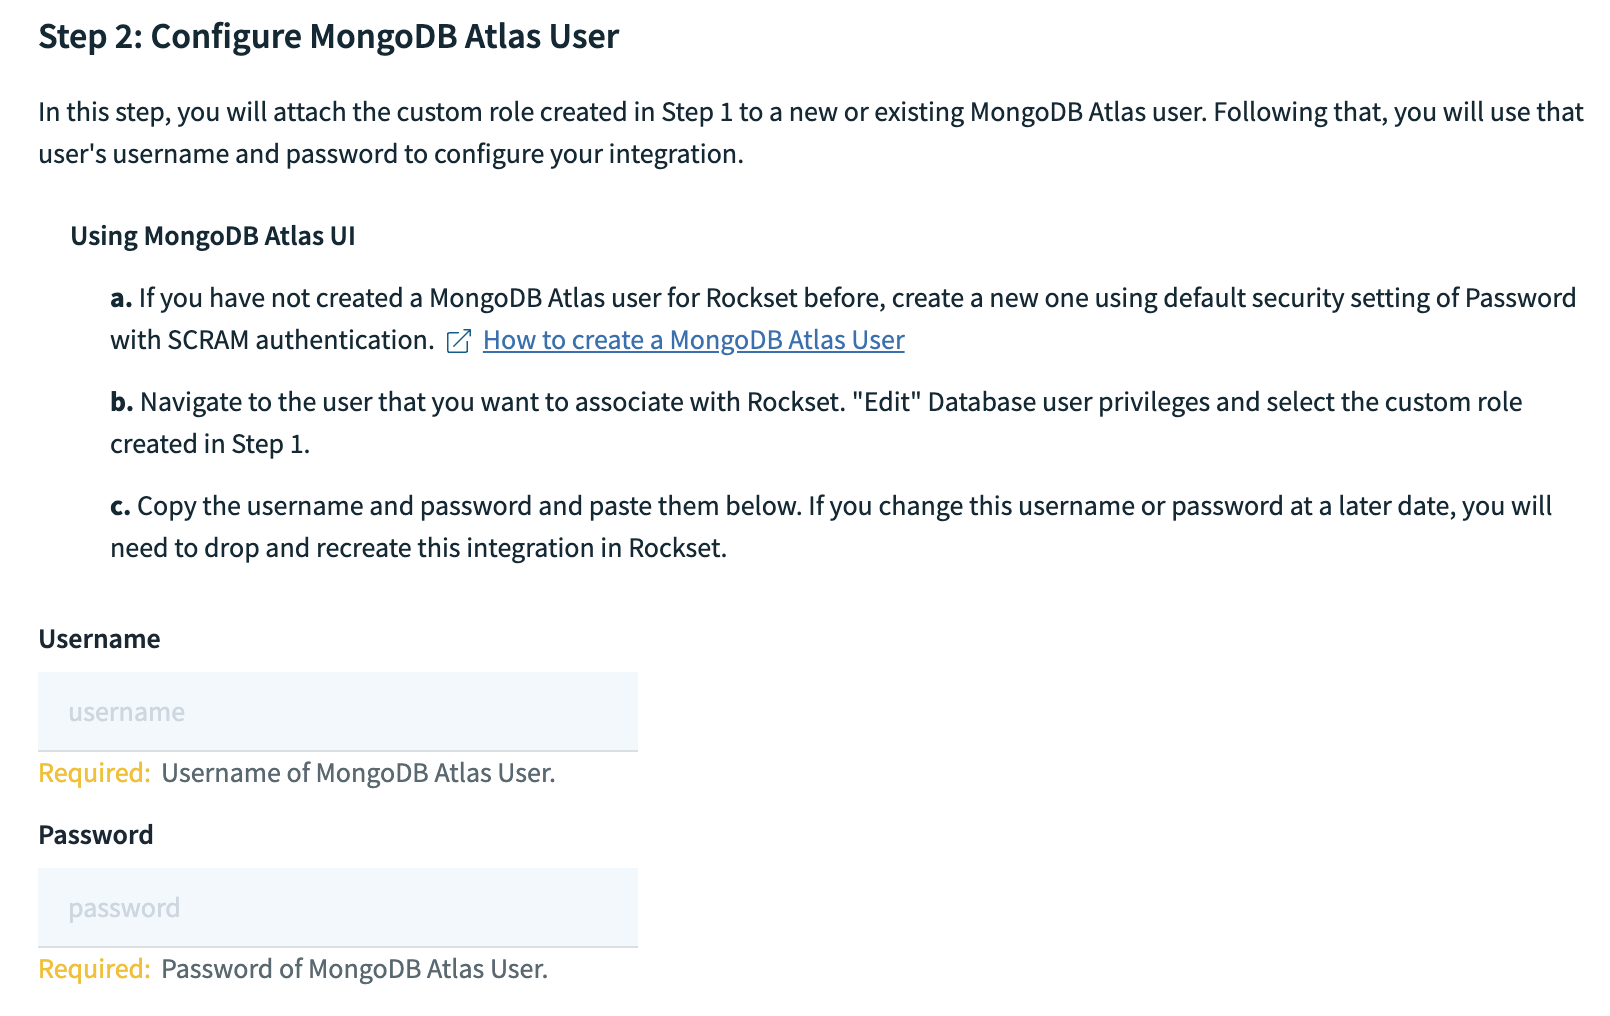
Step 2: Configure MongoDB Atlas User
You'll need to create a MongoDB Atlas user to grant Rockset permissions to access your MongoDB resources.
- Navigate to Database Access (from left navigation) in MongoDB Atlas UI.
- Set up a new user by navigating to Database Users and clicking "Add New Database User".
If you already have a user for Rockset set up, you may re-use it or update the custom role directly.
For more details, refer to MongoDB Atlas documentation on Database Users.

- Using SCRAM Password authentication enter a username and password for the database user and select the custom role created in Step 1 under Database User Privileges.

- Finish by clicking "Add User" and record both username and password in the Rockset Console within a new MongoDB integration.
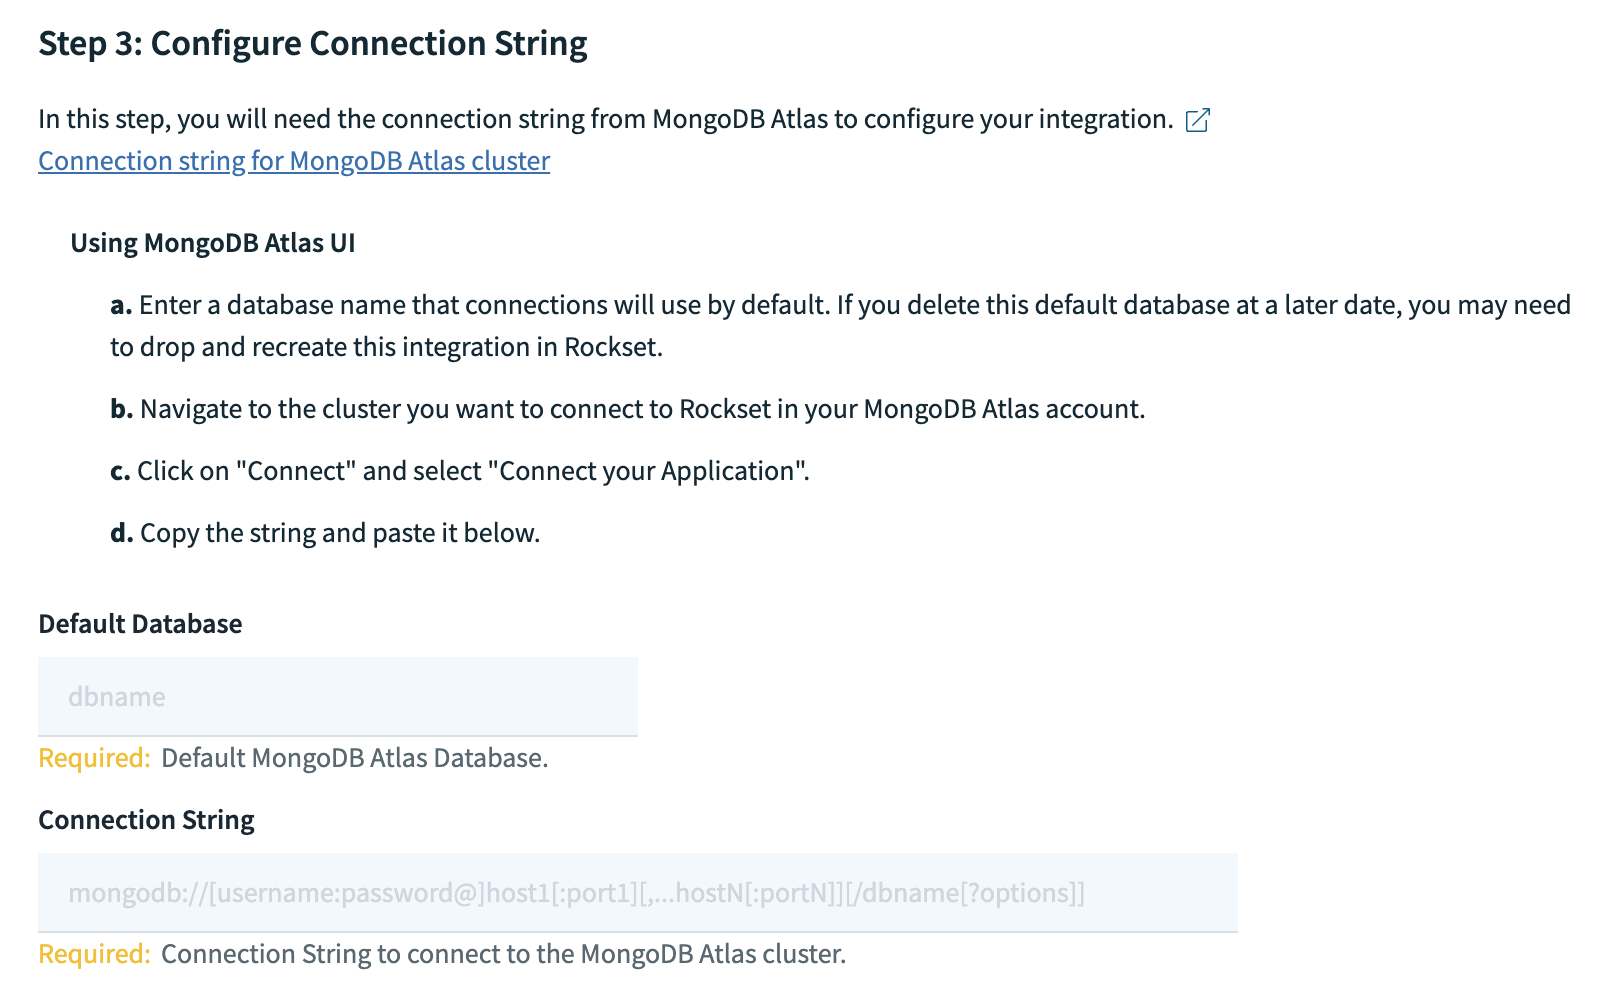
Step 3: Access Connection String
You'll need to provide the connection string for your MongoDB Atlas cluster for Rockset to connect to it.
- Navigate to the cluster (from left navigation) you want to connect to Rockset and click on "Connect".

- Select "Connect your application" for connection method.

- Copy the "Connection String" and record it in the Rockset Console for the integration. Also provide the name of the database that connections will use by default. Connection String looks like
mongodb+srv://<username>:<password>@cluster0.mongodb.net/<dbname>. You don't need to replaceusername,passwordanddbnametags in the connection string.

By default SCRAM-SHA-256 is used as the authentication mechanism. The authentication mechanism can be explicitly controlled using the authMechanism connection string parameter.
Step 4: Configure IP Access
To ensure connectivity with Atlas, you must allow the inbound network access from your application environment to MongoDB Atlas. For more details, refer to MongoDB Atlas documentation on IP Access List Entries. Select "Allow Access From Anywhere" to enable Rockset to access your MongoDB Atlas Cluster.
- Navigate to Network Access (from left navigation) in MongoDB Atlas UI.
- Click on "Add IP Address" and select "Allow Access from Anywhere."

Step 5: Create a MongoDB integration via Rockset Console
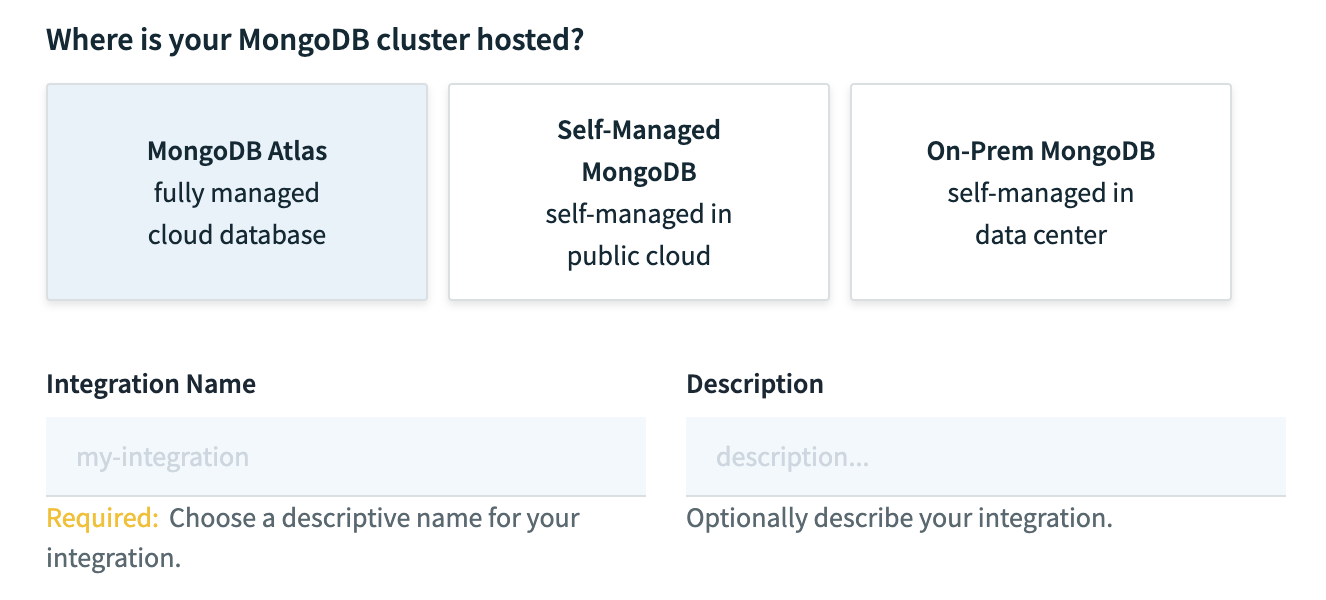
- On the MongoDB integration creation page, select "MongoDB Atlas" and enter a name for the integration. Optionally, add a description.
- Enter the username and password for the MongoDB Atlas user you created in Step 2.
- Enter the default database name and connection string from Step 3.
- Save the integration. You should now be able to create MongoDB collections using this integration.
Create a MongoDB Atlas Integration using X.509 authentication with client and server certificates signed by Atlas
Step 1: Configure MongoDB Atlas Custom Role
See Step 1 under SCRAM authentication.
Step 2: Configure MongoDB Atlas User
You'll need to create a MongoDB Atlas user to grant Rockset permissions to access your MongoDB resources.
- Navigate to Database Access (from left navigation) in MongoDB Atlas UI.
- Set up a new user by navigating to "Database Users" and clicking "Add New Database User".
If you already have a user for Rockset set up, you may re-use it or update the custom role directly.
For more details, refer to MongoDB Atlas documentation on Database Users.
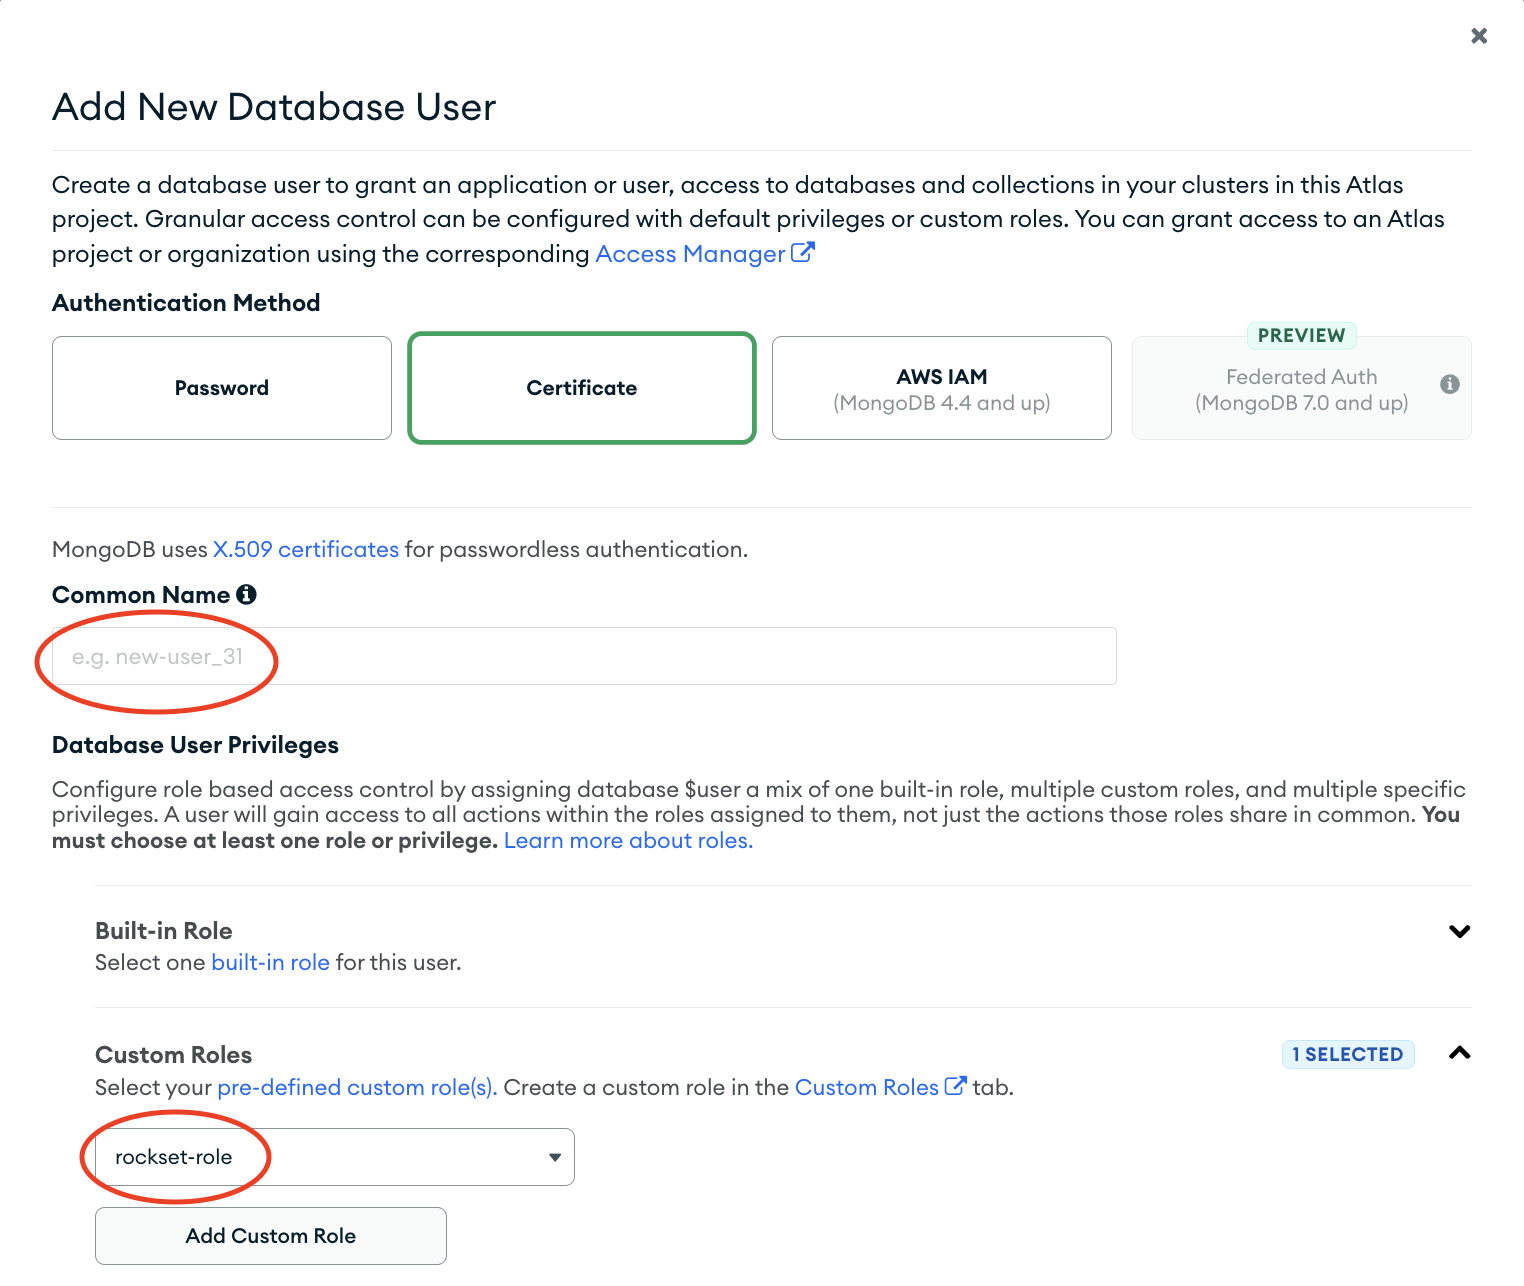
- Using Certificate authentication enter a common name for the certificate and make sure "Download certificate when user is added" is toggled on. Choose a certificate expiration (see Updating MongoDB Atlas integrations for instructions on how to update this certificate when it expires.) Select the custom role created in Step 1 under Database User Privileges.
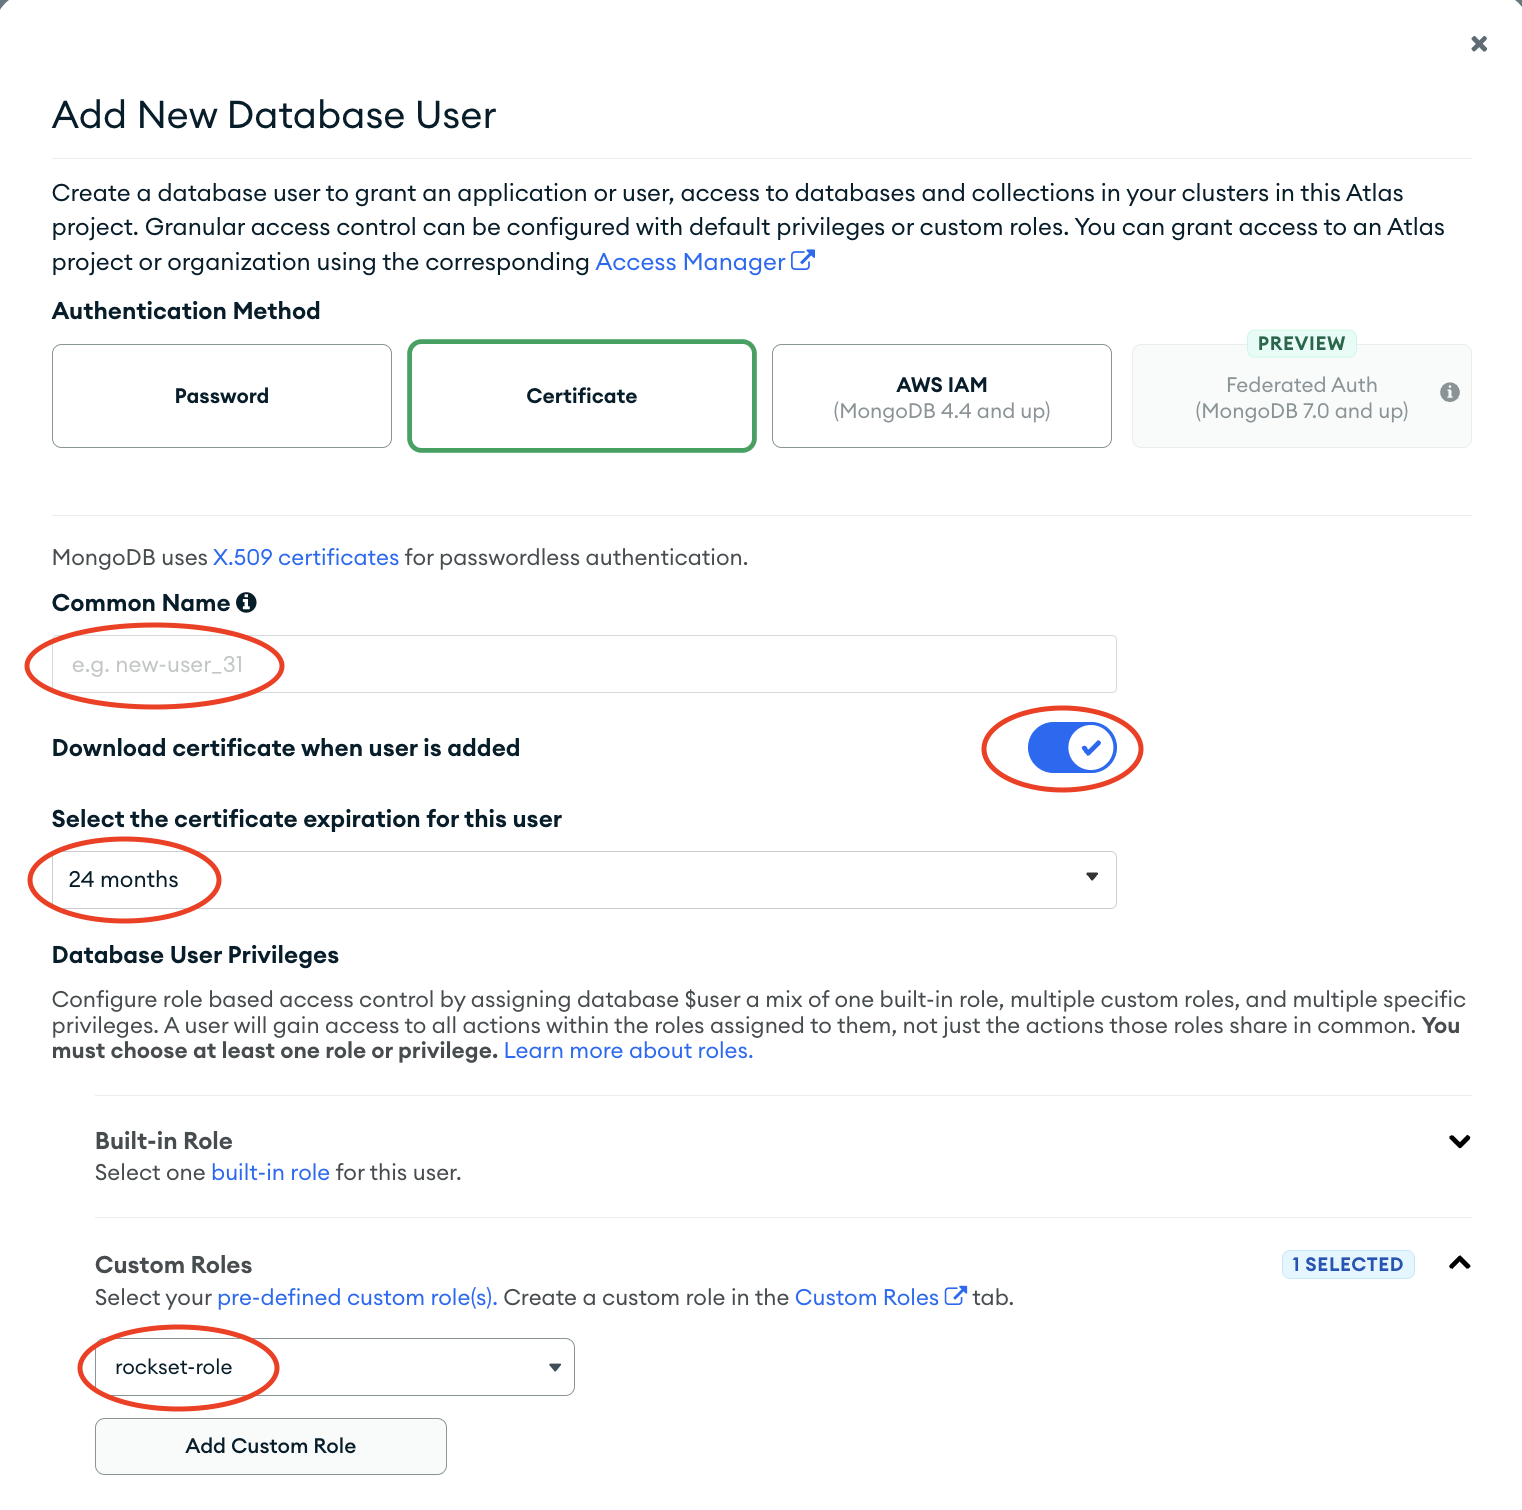
- Finish by clicking "Add User". A PEM file containing your client certificate and private key will be downloaded. Save these credentials for creating your MongoDB integration. You will need to copy the certificate and private key separately from the downloaded file when passing the credentials into the API request.
Step 3: Access Connection String
You'll need to provide the connection string for your MongoDB Atlas cluster for Rockset to connect to it.
- Navigate to the cluster (from left navigation) you want to connect to Rockset and click on "Connect".
- Select "Connect your application" for connection method.
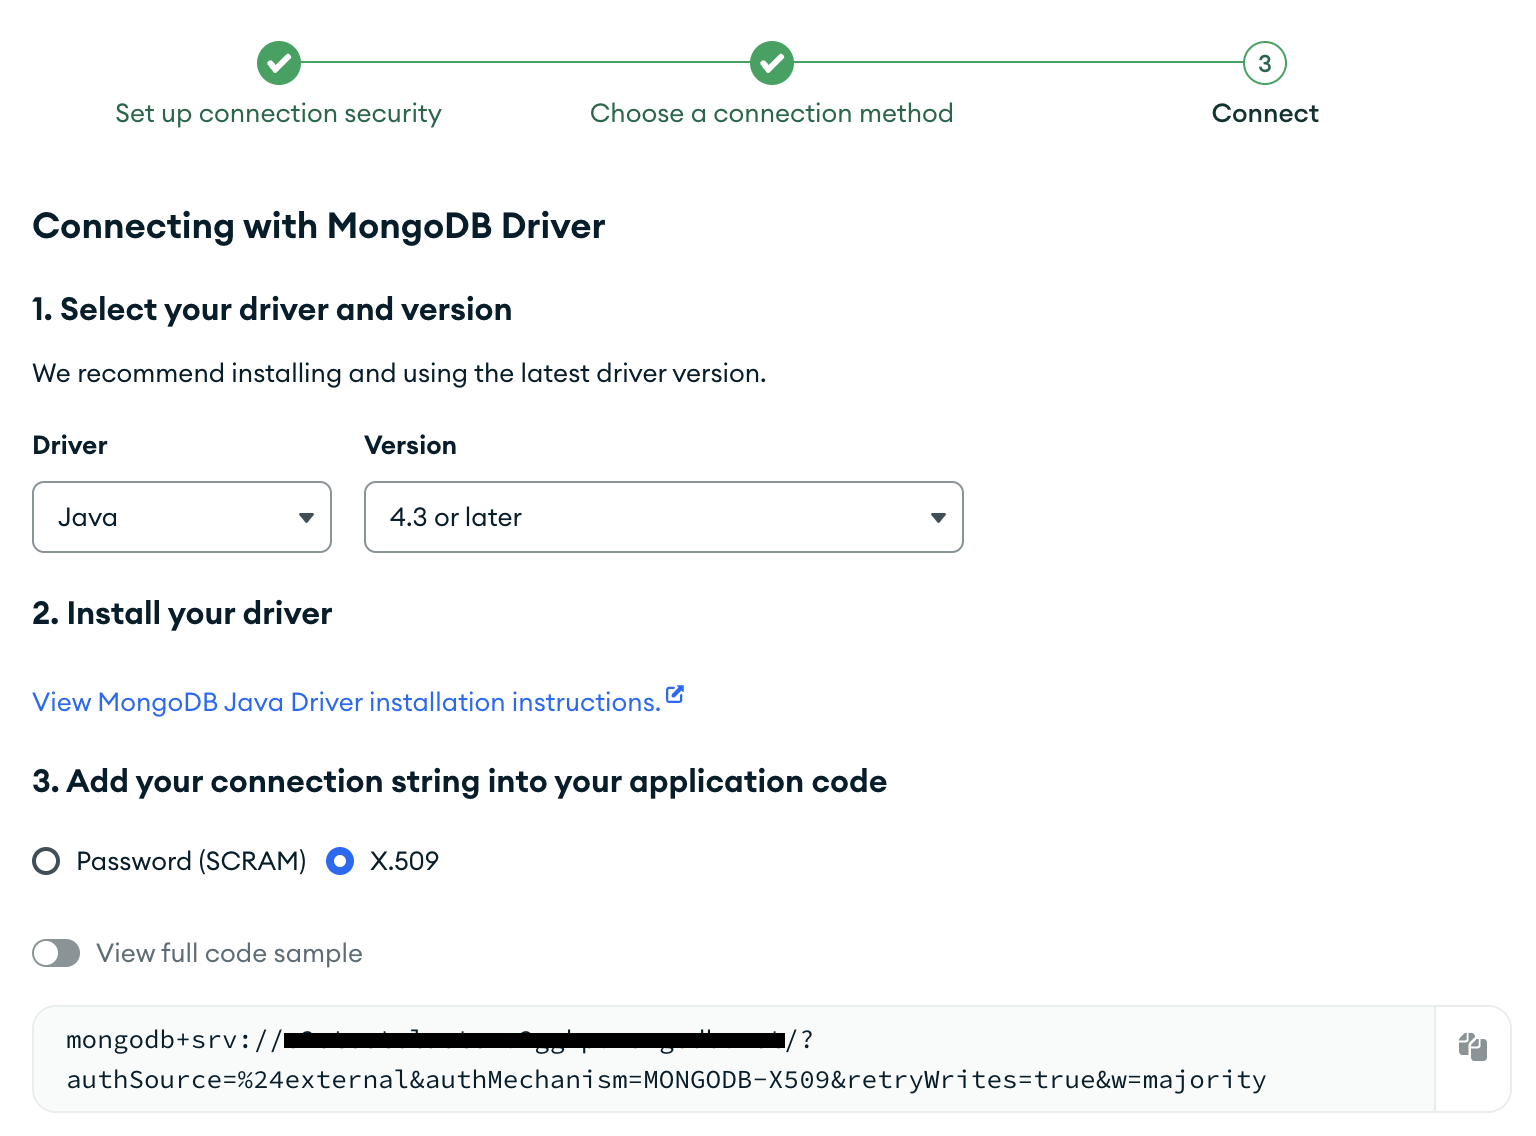
- Select the X.509 connection string option. Copy the "Connection String" and save it for creating the MongoDB integration. The connection string must have
?authSource=%24external&authMechanism=MONGODB-X509as parameters in the URI.
Step 4: Configure IP Access
See Step 4 under SCRAM authentication.
Step 5: Create a MongoDB Atlas X.509 integration via API or console
If you are authenticating to MongoDB Atlas using X.509 certificates, you may create an integration via REST API. Below is an example cURL request:
curl --request POST \
     --url https://api.usw2a1.rockset.com/v1/orgs/self/integrations \
     --header 'Authorization: <api_key>' \
     --header 'accept: application/json' \
     --header 'content-type: application/json'
     --data '
{
	"name": "integration_name",
	"mongodb": {
		"connection_uri": "mongodb+srv://cluster.abcde.mongodb.net/?authSource=%24external&authMechanism=MONGODB-X509",
		"tls": {
			"client_cert": "-----BEGIN CERTIFICATE-----...",
			"client_key": "-----BEGIN PRIVATE KEY-----...",
		}
	}
}
'
Do not specify the
ca_certfield. This field is only used for self-managed MongoDB.
You can use the following snippet to encode a certificate or private key file into a JSON string:
awk 'NF {sub(/\r/, ""); printf "%s\\n",$0;}' cert-name.pem
Create a MongoDB Atlas Integration using X.509 authentication with client certificates signed by private/self-managed CA
Step 1: Configure MongoDB Atlas Custom Role
See Step 1 under SCRAM authentication.
Step 2: Configure MongoDB Atlas User
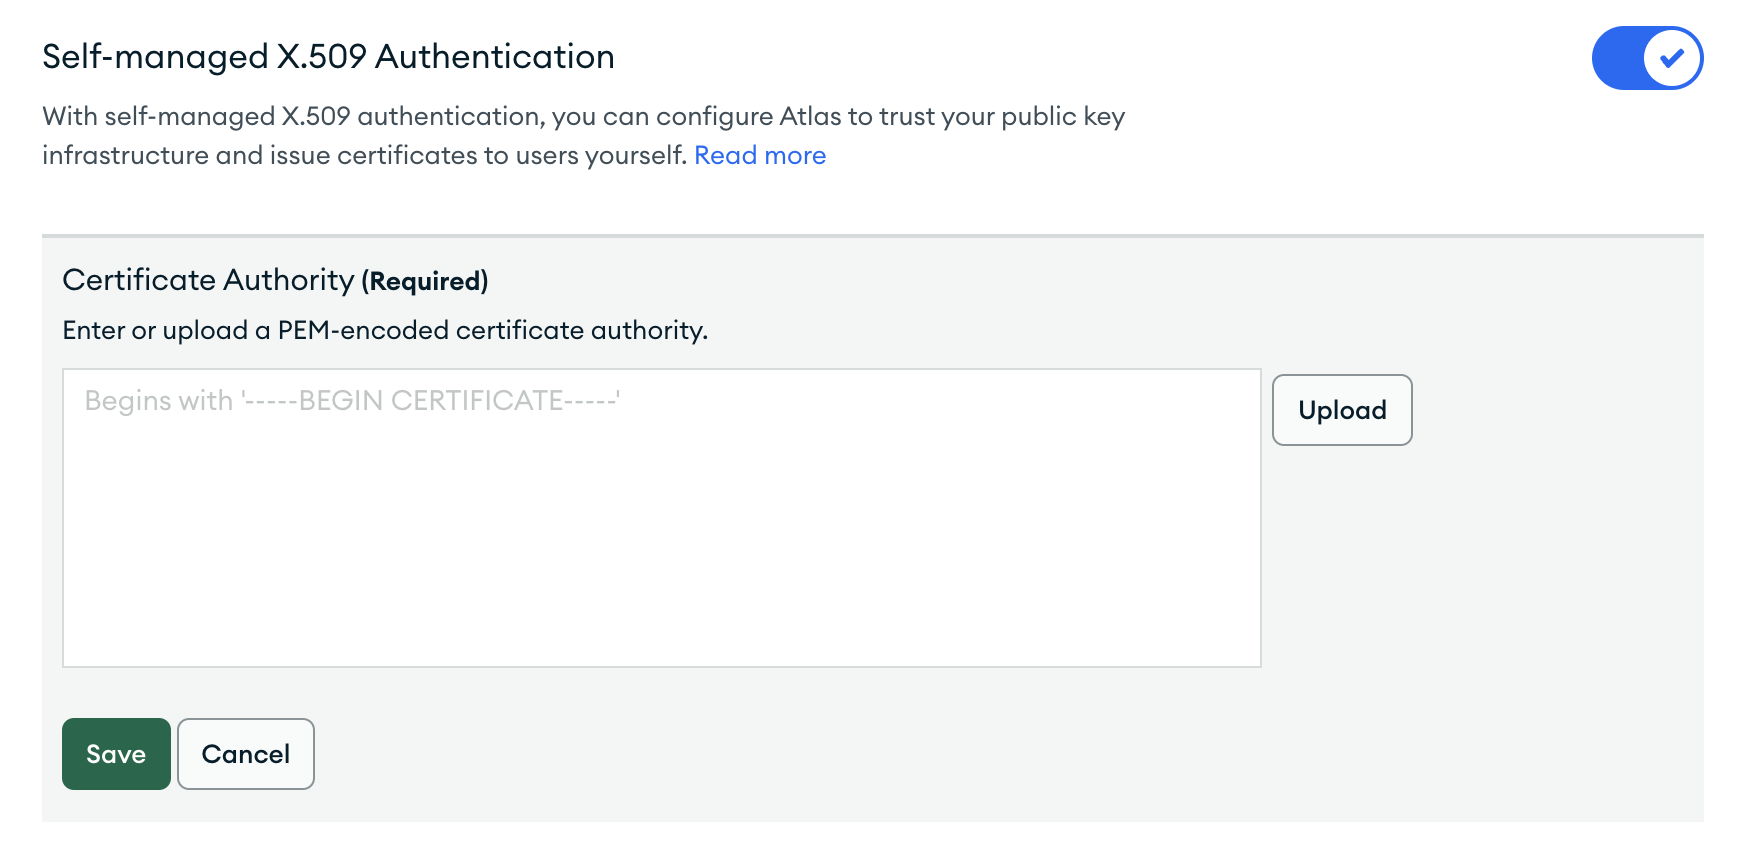
- You will need to integrate your CA with MongoDB Atlas. In the Security section of Atlas's left side panel, select Advanced. Toggle Self-Managed X.509 Authentication to ON and provide a PEM-encoded certificate authority.
- Generate a new certificate/private key from your CA. Save these credentials for creating your MongoDB integration.
Next, you'll need to create a MongoDB Atlas user to grant Rockset permissions to access your MongoDB resources.
- Navigate to "Database Access" (from left navigation) in MongoDB Atlas UI.
- Set up a new user by navigating to "Database Users" and clicking "Add New Database User".
If you already have a user for Rockset set up, you may re-use it or update the custom role directly.
For more details, refer to MongoDB Atlas documentation on Database Users.
- Using Certificate authentication enter a common name for the certificate. Note that this common name should match the subject that was given to the generated certificate/private key. Select the custom role created in Step 1 under "Database User Privileges".
You can retrieve the subject from a x.509 certificate with the following command:
openssl x509 -in <pathToClientPEM> -inform PEM -subject -nameopt RFC2253
- Finish by clicking "Add User".
Step 3: Access Connection String
You'll need to provide the connection string for your MongoDB Atlas cluster for Rockset to connect to it.
- Navigate to the cluster (from left navigation) you want to connect to Rockset and click on
"Connect".
- Select "Connect your application" for connection method.
- Select the X.509 connection string option. Copy the "Connection String" and save it for creating the MongoDB integration. The connection string must have
?authSource=%24external&authMechanism=MONGODB-X509as parameters in the URI.
Step 4: Configure IP Access
See Step 4 under SCRAM authentication.
Step 5: Creating a MongoDB Atlas X.509 integration via API
If you are authenticating to MongoDB Atlas using X.509 certificates, you must create an integration via REST API or through the console. Below is an example cURL request:
curl --request POST \
     --url https://api.usw2a1.rockset.com/v1/orgs/self/integrations \
     --header 'Authorization: <api_key>' \
     --header 'accept: application/json' \
     --header 'content-type: application/json'
     --data '
{
	"name": "integration_name",
	"mongodb": {
		"connection_uri": "mongodb+srv://cluster.abcde.mongodb.net/?authSource=%24external&authMechanism=MONGODB-X509",
		"tls": {
			"client_cert": "-----BEGIN CERTIFICATE-----...",
			"client_key": "-----BEGIN PRIVATE KEY-----...",
		}
	}
}
'
Do not specify the
ca_certfield. This field is only used for self-managed MongoDB.
You can use the following snippet to encode a certificate or private key file into a JSON string:
awk 'NF {sub(/\r/, ""); printf "%s\\n",$0;}' cert-name.pem
Updating a MongoDB Atlas integration
You may want to update a MongoDB Atlas integration to refresh an expiring certificate. Please reference the REST API documentation for how to update an integration.
Common MongoDB Atlas integration creation issues
- If you get
"Command failed with error 18 (AuthenticationFailed): 'No user name provided'when creating the integration, check that your connection string is for the cluster that your user was created in. - For client certificates signed by private/self-managed CA,
Command failed with error 8000 (AtlasError): 'authentication failed. User not found' on servercould indicate that the common name of the user created in Atlas does not match the subject in the client certificate.
Updated 3 months ago