
MongoDB Self Managed
For the following steps, you must have access to a MongoDB instance and be able to manage Custom Roles and Database Users within it.
If you do not have access, please invite your MongoDB administrator to Rockset.
Create a Self-Managed MongoDB Integration
The steps below show how to set up a self-managed MongoDB integration using MongoDB SCRAM Authentication or MongoDB X.509 Authentication. An integration can provide access to one or more MongoDB collections across different databases in the same self-managed MongoDB cluster. You can use an integration to create Rockset collections that continuously sync data from your MongoDB collections.
Prerequisites
For self-managed MongoDB in the public cloud or a data center, the following prerequisites are required:
- The MongoDB cluster must be accessible to Rockset.
- The MongoDB database must be exposed to public internet. AWS DocumentDB is not supported.
- MongoDB must use SCRAM or x.509 Certificate Authentication. For more details, refer to
MongoDB documentation on Authentication.- LDAP, Kerberos, AWS IAM, and other authentication mechanisms are not supported.
- MongoDB change streams must be enabled. For more details refer to
MongoDB documentation on Change Streams.- This feature is only available for replica sets and sharded clusters. Standalone instances are
not supported. - Use the WiredTiger storage engine and the
readConcernoption. - Apply MongoDB production recommendations for change streams.
- This feature is only available for replica sets and sharded clusters. Standalone instances are
- The MongoDB version must be 4.0 or higher.
Create a Self-Managed MongoDB Integration with SCRAM authentication
Step 1: Configure MongoDB Custom Role
- Using MongoDB Shell (
mongosh), create a new custom role. If you already have a role set up for Rockset, you may update that existing role. For more details, refer to MongoDB documentation on Manage Users and Roles. - Set up read-only access to your MongoDB collection. Add the following actions or roles:
find,changeStream,collStatsand also specify the names of databases as well as collections for each of these actions or roles. You can update access to databases and collections via MongoDB Shell at any time without changes required in Rockset integration. The same integration can be used to create more Rockset collections based on permissions. - Give the newly created or updated custom role a descriptive name. You will attach this custom role to a new or existing MongoDB user.
db.createRole(
   {
      role: "rockset-role",
      privileges: [
         {
            resource: { db: "dbName", collection: "collectionName" },
            actions: [ "find", "changeStream", "collStats" ]
         }
      ],
      roles: []
   }
)
Why these permissions?
find- Required for initial collection scan when reading data.changeStream- Required for retrieving records from MongoDB Change Streams.collStats- Required for metadata about MongoDB collections.
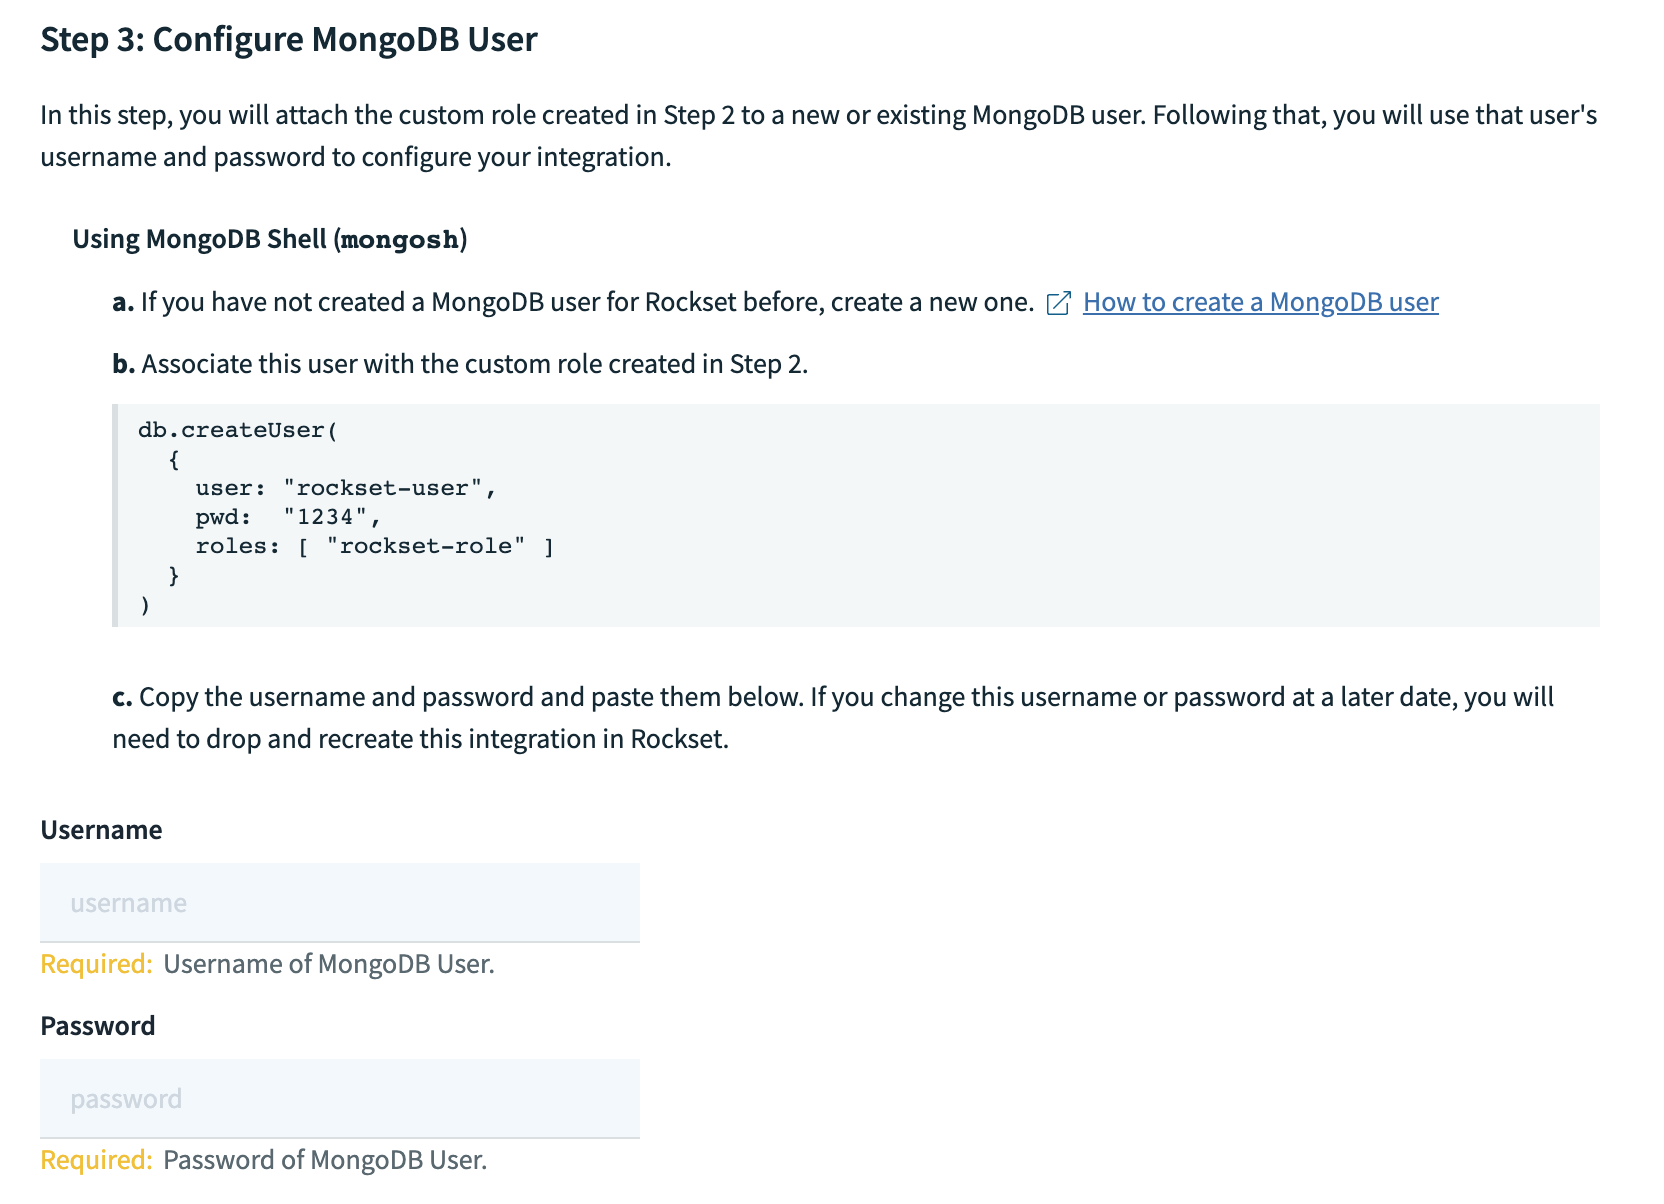
Step 2: Configure MongoDB User
You'll need to create a MongoDB user to grant Rockset permissions to access your MongoDB resources.
- Using MongoDB shell (
mongosh), set up a new user.
If you already have a user for Rockset set up, you may re-use it or update the custom role directly.
For more details, refer to MongoDB documentation on Create a User.
- Using SCRAM password authentication specify a username and password for the database user, and specify the custom role created in Step 2.
- Record both username and password in the Rockset Console within a new MongoDB integration.
db.createUser(
   {
      user: "rockset-user",
      pwd:  "1234",
      roles: [ "rockset-role" ]
   }
)
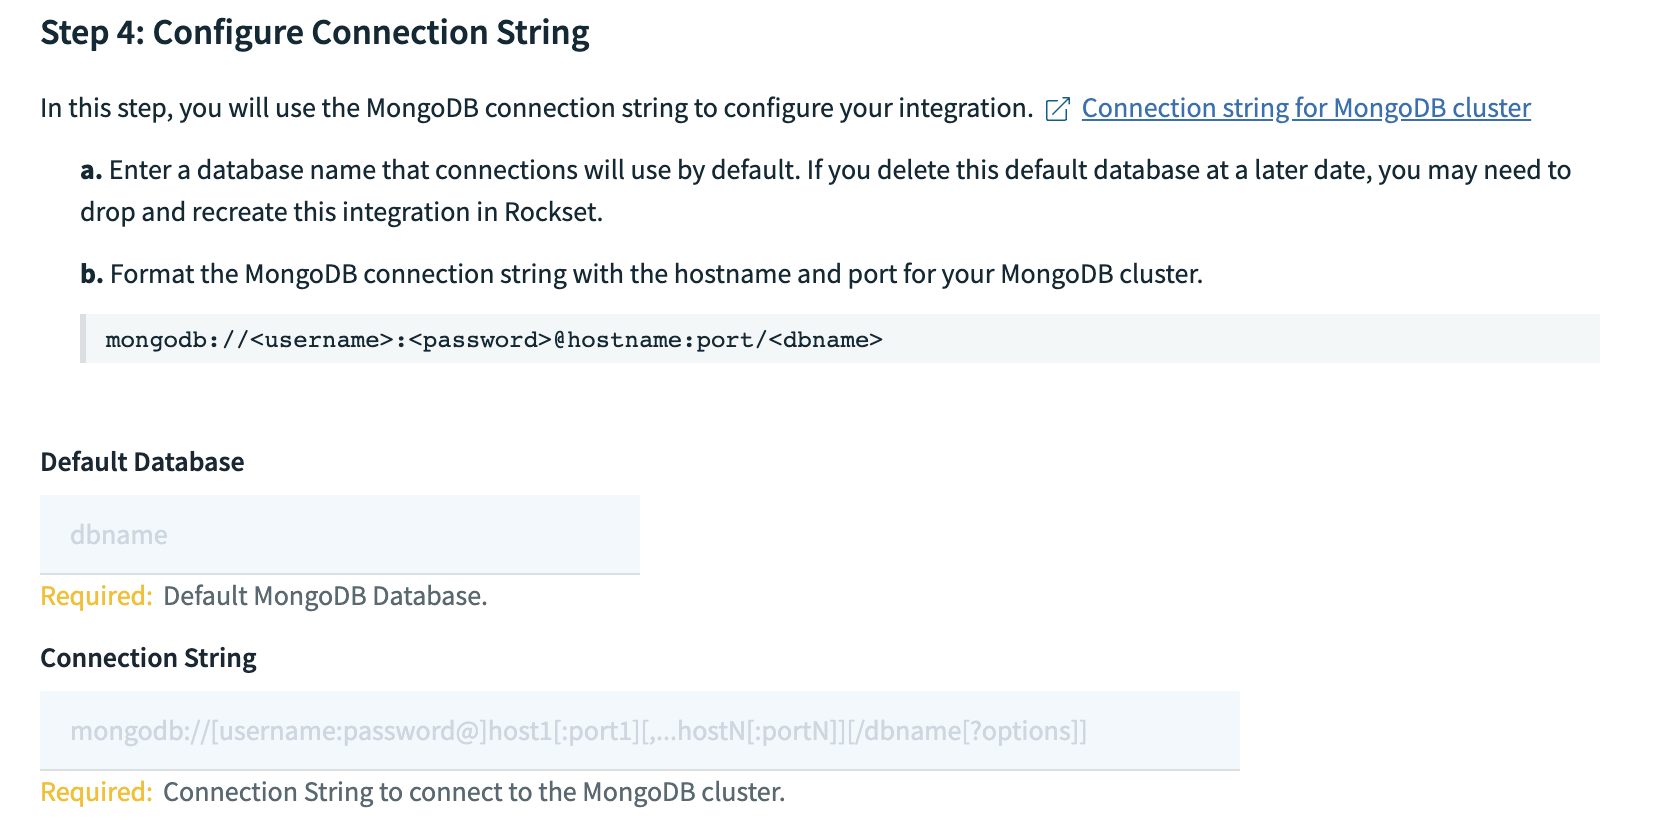
Step 3: Configure Connection String
You'll need to provide the connection string for your MongoDB cluster for Rockset to connect to it.
- Provide the name of the database that connections will use by default.
- Format the connection string
mongodb://<username>:<password>@hostname:port/<dbname>with the hostname and port of your MongoDB cluster. You don't need to replaceusername,passwordanddbnametags in the connection string. Record the connection string in the Rockset Console for the integration.
Step 4: Configure IP Access
To ensure connectivity with your MongoDB cluster, you must allow the inbound network access from your application environment to MongoDB. Enable the bindIpAll setting for Rockset to access your MongoDB cluster..
- Open the
mongodconfiguration file for editing. - Under
netoptions, set thebindIpAllsetting totrue. - Restart the
mongodprocess to make these changes take effect. - Ensure that the cluster running MongoDB also allowlists all IP addresses.
Step 5: Creating a MongoDB Atlas X.509 integration via Rockset Console
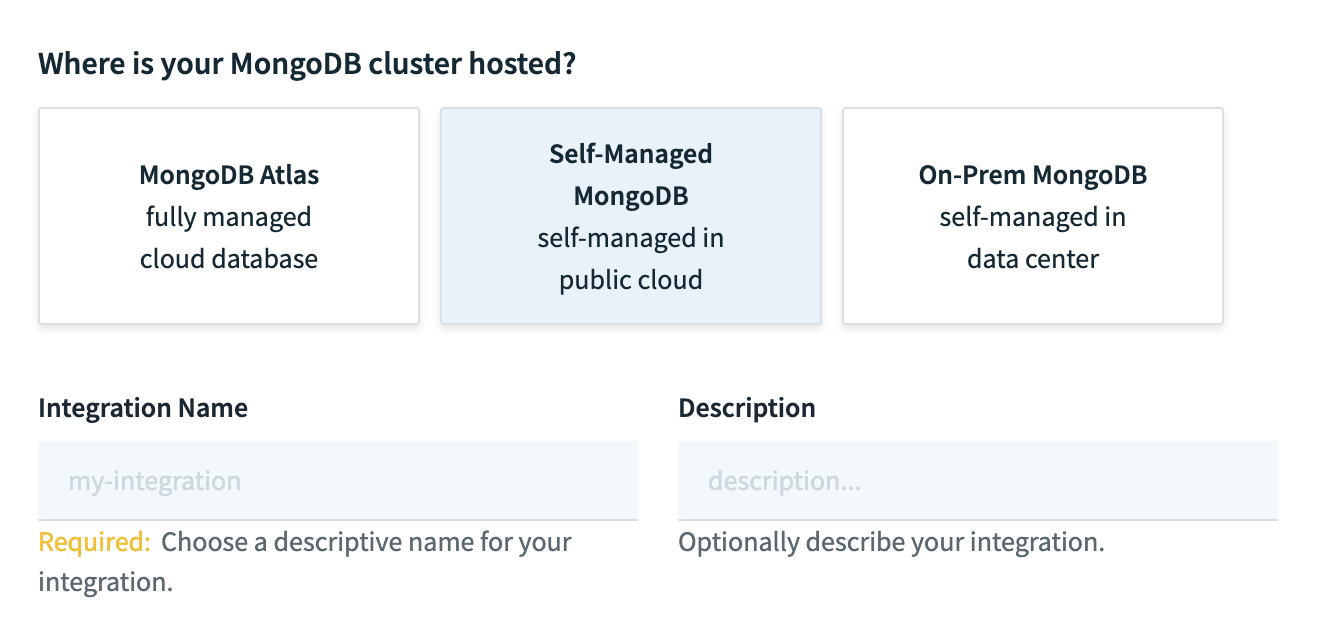
- On the MongoDB integration creation page, select "Self-Managed MongoDB" or "On-Prem MongoDB" and enter a name for the integration. Optionally, add a description.
- Enter the username and password for the MongoDB Atlas user you created in Step 3.
- Enter the default database name and connection string from Step 4.
- Save the integration. You should now be able to create MongoDB collections using this integration.
Create a Self-Managed MongoDB Integration with X.509 authentication
Step 1: Configure MongoDB Custom Role
See Step 1 under SCRAM authentication.
Step 2: Configure MongoDB User
- Generate a new certificate/private key from your CA. Save these credentials for creating your MongoDB integration.
Next, you'll need to create a MongoDB user to grant Rockset permissions to access your MongoDB resources.
- Using MongoDB shell (
mongosh), set up a new user.
If you already have a user for Rockset set up, you may re-use it or update the custom role directly.
For more details, refer to MongoDB documentation on Create a User.
- Create a user in the
$externaldatabase, specifying the custom role created in Step 2. You must use the value of the subject from the certificate you generated earlier as theuserfield. Each unique x.509 client certificate corresponds to a single MongoDB user. You do not need to specify a password.
You can retrieve the subject from a x.509 certificate with the following command:
openssl x509 -in <pathToClientPEM> -inform PEM -subject -nameopt RFC2253
The following operation adds the client certificate subject CN=myName,OU=myOrgUnit,O=myOrg,L=myLocality,ST=myState,C=myCountry user with access given by rockset-role.
use $external
db.createUser(
    {
      user: "CN=myName,OU=myOrgUnit,O=myOrg,L=myLocality,ST=myState,C=myCountry",
      roles: [ "rockset-role" ]
    }
)
Step 3: Configure Connection String
You'll need to provide the connection string for your MongoDB cluster for Rockset to connect to it.
- Provide the name of the database that connections will use by default.
- Format the connection string
mongodb://hostname:port/?authSource=%24external&authMechanism=MONGODB-X509with the hostname and port of your MongoDB cluster. Save this connection string for creating the MongoDB integration.
Step 4: Configure IP Access
To ensure connectivity with your MongoDB cluster, you must allow the inbound network access from your application environment to MongoDB. Enable the bindIpAll setting for Rockset to access your MongoDB cluster.
- Open the
mongodconfiguration file for editing. - Under
netoptions, set thebindIpAllsetting totrue. - Restart the
mongodprocess to make these changes take effect. - Ensure that the cluster running MongoDB also allowlists all IP addresses.
Step 5: Creating a Self-Managed MongoDB X.509 integration via API or console
If you are authenticating to self-managed MongoDB using X.509 certificates, you may create an integration via REST API or through the console. Below is an example cURL request:
curl --request POST \
     --url https://api.usw2a1.rockset.com/v1/orgs/self/integrations \
     --header 'Authorization: <api_key>' \
     --header 'accept: application/json' \
     --header 'content-type: application/json'
     --data '
{
	"name": "integration_name",
	"mongodb": {
		"connection_uri": "mongodb+srv://cluster.abcde.mongodb.net/?authSource=%24external&authMechanism=MONGODB-X509",
		"tls": {
			"client_cert": "-----BEGIN CERTIFICATE----- <client certificate>...",
			"client_key": "-----BEGIN PRIVATE KEY-----...",
      "ca_cert": "-----BEGIN CERTIFICATE----- <CA certificate>..."
		}
	}
}
'
You can use the following snippet to encode a certificate or private key file into a JSON string:
awk 'NF {sub(/\r/, ""); printf "%s\\n",$0;}' cert-name.pem
Updated 3 months ago