
Snowflake
This page covers how to use a Snowflake table as a data source in Rockset. The Snowflake integration is managed entirely by Rockset and doesn't require any infrastructure set up on the Snowflake side.
These step-by-step instructions will allow you to ingest data from your Snowflake table(s) into Rockset and include:
- Creating an Integration to securely connect with a Snowflake database.
- Creating a Collection in Rockset which will receive data from Snowflake table via the integration created.
Necessary Account Access
For the following steps, you must have:
- Access to an AWS account and be able to manage AWS IAM policies and S3 buckets within it. If you do not have access, please invite your AWS administrator to Rockset.
- Access to a Snowflake account to create a user with appropriate privileges to read a database (including any schema and tables within it) and use a virtual warehouse to run queries.
Create a Snowflake Integration
The steps below show how to create an integration with Snowflake. An integration can provide access to one or more tables within a Snowflake account and the integration can subsequently be used to create one or more collections. You can use an integration to create collections that syncs data from your Snowflake tables.
Follow the steps below to set up a Snowflake integration:
- Configure Snowflake Details
- Configure AWS IAM Policy
- Configure AWS Cross-Account IAM Role or IAM User
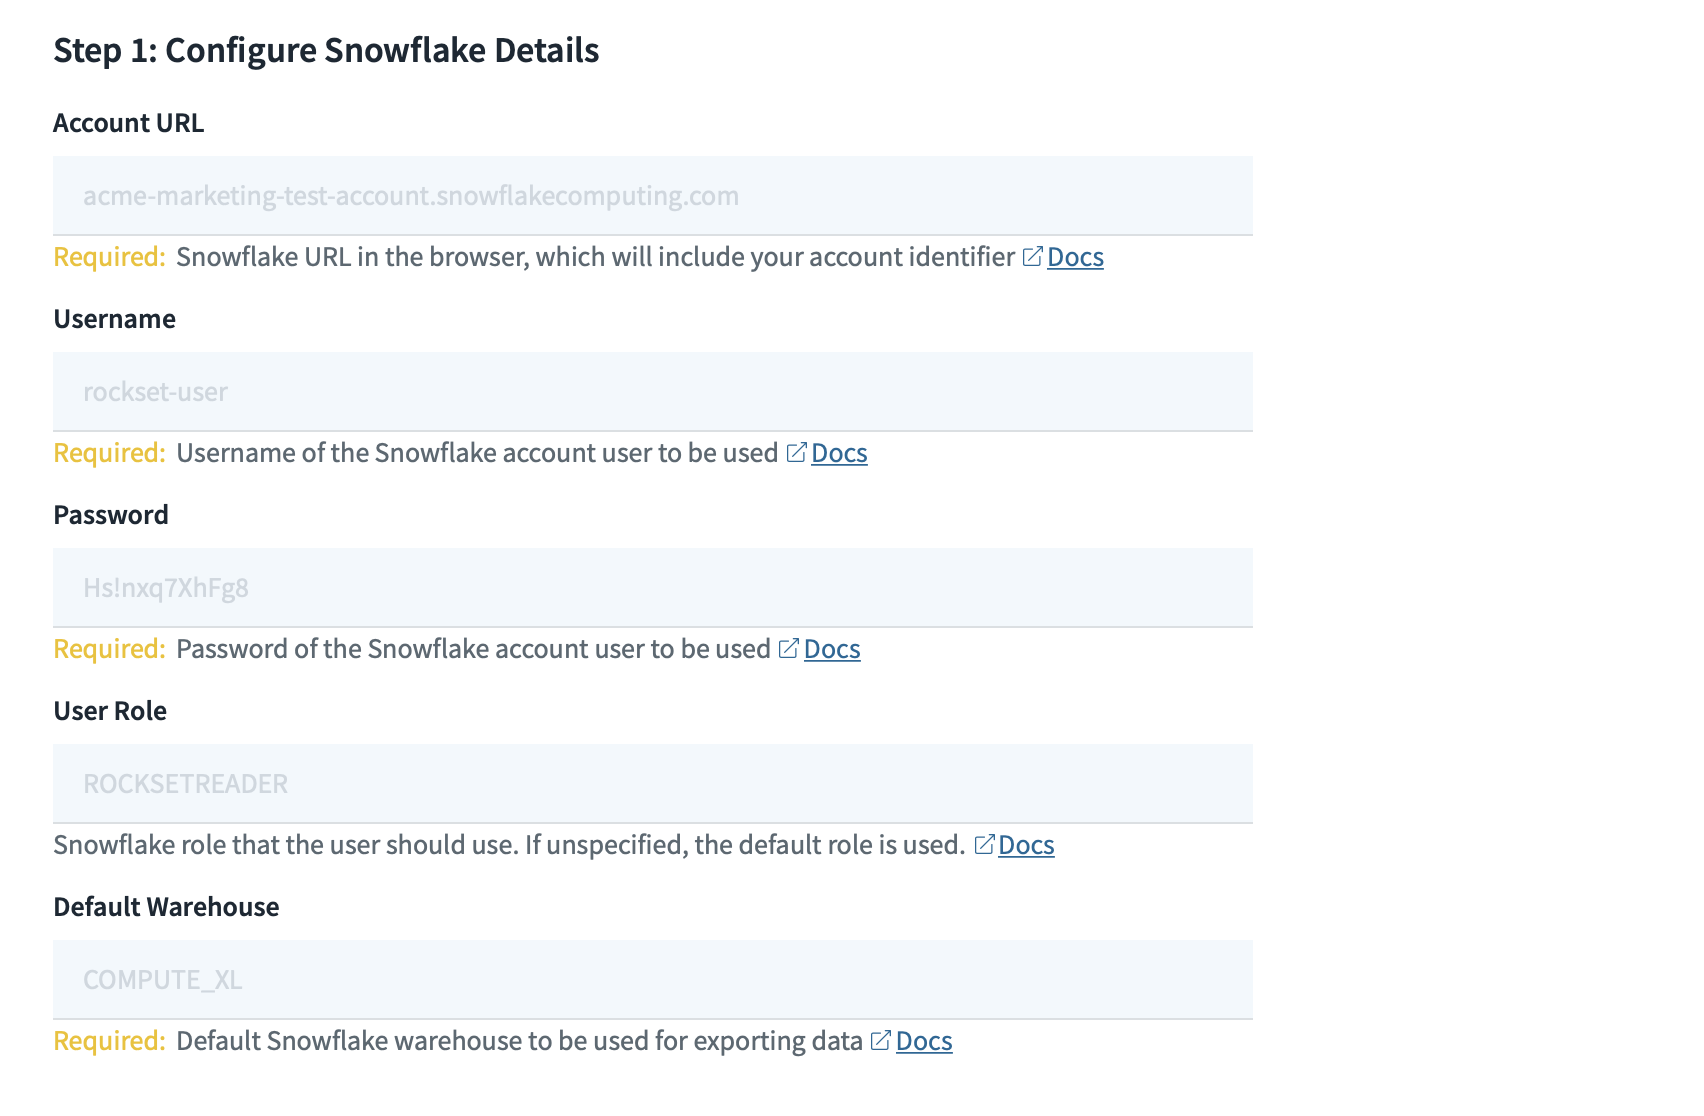
Configure Snowflake Details
- Create a user in Snowflake for Rockset to login as and run queries. A sample SQL script to create a Snowflake user is shown below:
-- SAMPLE script for creating a user with minimal privileges for
-- a Rockset user to read and copy data into S3

CREATE OR REPLACE ROLE ROCKSETREADER
  COMMENT='role needed for Rockset to read and copy';

-- allow access to a database and a schema
GRANT USAGE ON DATABASE CONNECTOR_DB TO ROLE ROCKSETREADER;
GRANT USAGE ON SCHEMA CONNECTOR_DB.TYPES_PLAYGROUND TO ROLE ROCKSETREADER;

-- allow querying all existing and future tables of the schema
GRANT SELECT ON ALL TABLES in SCHEMA CONNECTOR_DB.TYPES_PLAYGROUND TO ROLE ROCKSETREADER;
GRANT SELECT ON FUTURE  TABLES in SCHEMA CONNECTOR_DB.TYPES_PLAYGROUND TO ROLE ROCKSETREADER;

-- allow using the virtual warehouse so Rockset can run queries
GRANT USAGE ON WAREHOUSE COMPUTE_WH TO ROLE ROCKSETREADER;

-- create the user and allow it to use the role
CREATE USER restrictedcopy
  PASSWORD = '<REDACTED_VALUE>'
  MUST_CHANGE_PASSWORD = FALSE
  DEFAULT_ROLE = 'ROCKSETREADER';
GRANT ROLE ROCKSETREADER TO USER restrictedcopy;
-
Enter the snowflake account details, which will be used to run the export queries.
Configure AWS IAM Policy
In order to export Snowflake data to S3, you must set up an IAM policy with read/write permissions to the S3 path.
- Navigate to the IAM Service in the AWS Management Console.
- Set up a new policy by navigating to Policies and clicking "Create policy".
If you already have a policy set up for Rockset, you may update that existing policy.
For more details, refer to AWS Documentation on IAM Policies.

- Set up read and write access to your S3 path. You can switch to the
JSONtab and paste the policy shown below. You must replace<bucket>in the policy with your S3 bucket name.
{
  "Version": "2012-10-17",
  "Statement": [
    {
      "Effect": "Allow",
      "Action": [
        "s3:Get*",
        "s3:List*",
        "s3:PutObject"
      ],
      "Resource": "arn:aws:s3:::<bucket>/*"
    },
    {
      "Effect": "Allow",
      "Action": [
        "s3:List*"
      ],
      "Resource": "arn:aws:s3:::<bucket>",
      "Condition": {
        "StringLike": {
          "s3:prefix": [
            "*"
          ]
        }
      }
    },
    {
      "Effect": "Allow",
      "Action": [
        "s3:ListBucket",
        "s3:GetBucketLocation"
      ],
      "Resource": "arn:aws:s3:::<bucket>"
    }
  ]
}
- Save the newly created or updated policy and give it a descriptive name. You will attach this policy to a user or role in the next step.
Configure AWS Cross-Account IAM Role or IAM User
There are two mechanisms you can use to grant Rockset permissions to your AWS resource:
- Cross-Account roles (strongly recommended as they are more secure and easier to manage)
- Access Keys (deprecated)
AWS Cross-Account IAM Role
The most secure way to grant Rockset access to your AWS account, is to add cross-account access in Rockset. To do so, you'll need to create an IAM Role that assumes your newly created policy on Rockset's behalf.
You'll need information from the Rockset Console to create and save this integration.
Follow the steps below to set up this role:
-
Navigate to the IAM service in the AWS Management Console.
-
Set up a new role.
If you already have a role for Rockset set up, you can re-use it and either add or update the above policy directly.

- Select "Another AWS account" as a trusted entity type, and and tick the box for "Require External ID". Fill in the Account ID and External ID fields with the values (Rockset Account ID and External ID respectively) found on the Create Integration page of the Rockset Console(under the Cross-Account Role Option). Click to continue.

- Choose the policy created for this role. Go back to step 1 to create the policy if needed. Click to continue.

- Optionally, add any tags and click "Next". Name the role descriptively (e.g., 'rockset-role'). sure you record the Role ARN for the Rockset integration in the Rockset Console.
AWS Access Key (deprecated)
Follow the steps below to set up an access key:
-
Navigate to the IAM service in the AWS Management Console.
-
Create a new user by navigating to Users and clicking "Add User".
If you already created a user for Rockset, you can attach the policy created in the previous section to that user.
- Enter a name for the user and check the "Programmatic access** option. Click to continue.
- Choose "Attach existing policies directly" and select the policy you created in Step 1. Click through the remaining steps to finish creating the user.

- When the new user is successfully created, you should see the Access key ID and Secret access key displayed on the screen.

If you are attaching the policy to an existing IAM user, navigate to Security Credentials under the IAM user and generate a new access key.
- Record both of these values in the Rockset Console within a new Snowflake integration.
Validate Network Policies
Snowflake allows users to connect to the service from any computer or device IP address by default. Ensure the network policies do not restrict access to your account based on user IP addresses.
Create a Collection
You can create a Rockset collection from a Snowflake table in the Collections tab of the Rockset Console.

The Snowflake integration only supports initial data ingestion. Updates made in Snowflake will not be automatically updated in your Rockset collection.
These operations can also be performed using any of the Rockset client libraries, the Rockset API, or the Rockset CLI.
Data Types
Rockset supports most Snowflake data types out of the box. At the moment, the Snowflake data types that need an ingest transformation to be ingested are shown below with the corresponding transformation:
BINARY:FROM_BASE64(BINARY)VARIANT:JSON_PARSE(VARIANT)ARRAY:JSON_PARSE(ARRAY)OBJECT:JSON_PARSE(OBJECT)TIMESTAMP_LTZ:PARSE_TIMESTAMP('%Y-%m-%d %H:%M:%E*S %Ez', TIMESTAMP_LTZ)TIMESTAMP_TZ:PARSE_TIMESTAMP('%Y-%m-%d %H:%M:%E*S %Ez', TIMESTAMP_TZ)
The following data types are currently not supported:
GEOGRAPHYVARIANT/ARRAY/OBJECTcontainingundefinedvalue
Updated 2 months ago