
Oracle
This page covers how to use a Oracle table as a data source in Rockset.
These step-by-step instructions will allow you to migrate your data from your Oracle database table(s) into Rockset collection(s) by using AWS’s Data Migration Service (DMS) to export your data to a target AWS Kinesis stream. Those Rockset collection(s) will stay in sync with your Oracle databases table(s) as they are updated in real-time by reading Oracle CDC streams. This includes:
- Setting up your Oracle Database
- Setting up a target AWS Kinesis Stream
- Setting up an AWS DMS Replication Instance and Migration Task
- Creating an Amazon Kinesis integration
These instructions will work with all of the following Oracle databases:
- Oracle database editions:
- Oracle Enterprise Edition
- Oracle Standard Edition
- Oracle Express Edition
- Oracle Personal Edition
- Versions: 11g (versions 11.2.0.4 and later) and up to 12.2, 18c, and 19c
Step 1: Oracle Database Configuration
For this step, there may be additional configuration steps required if you are using a self-managed version of Oracle. You can read more about setting up a self-managed Oracle database here.
[Optional] Step 1.1 - Create a Oracle user to allow DMS to access your data
We recommend that you use the admin user account when designating a Oracle user for AWS DMS to export your data. If you choose not to use the admin account, you will need to create a new user with the proper roles and as well as several additional associated objects. You can read more about creating a new Oracle user for AWS DMS here.
Step 1.2 - Enable Periodic Backups of Oracle
Oracle must be configured for full backup, and you must perform a backup before initiating the migration. The recovery mode must be Bulk logged or Full .
On AWS RDS Oracle instances, select the Oracle instance in the AWS Console and navigate to the Maintenance and Backups tab. If automatic backups are not enabled, modify the Oracle instance to
enable the feature. After you are done, the Maintenance and Backups tab should look something like this:

Step 1.3 - Configure Oracle database for ongoing replication
To replicate changes to DMS, the Oracle database and tables must be configured for change data capture with supplemental logging. The specific commands depend on the environment and table schemas.
For AWS RDS Oracle instances, you can setup supplemental logging with the following commands:
-- Setup archiving with 24 hour retention period
exec rdsadmin.rdsadmin_util.set_configuration('archivelog retention hours',24);
commit;

-- Setup supplemental logging, to capture all columns on updates
exec rdsadmin.rdsadmin_util.alter_supplemental_logging('ADD');
exec rdsadmin.rdsadmin_util.alter_supplemental_logging('ADD', 'ALL');
For Self managed Oracle databases, you can validate that the version is supported by running the following commands:
---- Validations

-- validate CDC is supported by this instance: Command should run without any errors
SELECT name, value, description FROM v$parameter WHERE name = 'compatible';

-- Validate archive logs are configured: This should return ARCHIVELOG
SELECT log_mode FROM v$database;

---- Setup logging

-- setup supplemental logging
ALTER DATABASE ADD SUPPLEMENTAL LOG DATA;

-- setup supplemental logging on database level
ALTER DATABASE ADD SUPPLEMENTAL LOG DATA (ALL) COLUMNS;

-- setup supplemental logging for each replicated table
ALTER TABLE <TABLE_NAME> ADD SUPPLEMENTAL LOG DATA (PRIMARY KEY) COLUMNS;
The AWS DMS docs provide more details, particularly relevant when not using the admin role.
[Optional] Step 1.4 - Prepare for AWS DMS Binary Reader
AWS DMS supports two methods for tracking database changes: Oracle LogMiner and AWS DMS Binary Reader. LogMiner is the recommended approach, as it is easier to setup and supports most Oracle options. However, if database volume changes are very high, LogMiner has a performance impact and AWS Binary Reader may be preferrable.
Consul the AWS DMS Binary Reader docs for more details and how to setup AWS DMS Binary Reader.
Step 2: Setup your AWS Kinesis Streams
The AWS Kinesis Stream is the destination that DMS uses as the target of a migration job. We will create an individual migration task for each Oracle table you wish to connect with Rockset. Use the AWS Console as shown below to create an AWS Kinesis Data Stream.
It is recommended to use a separate Kinesis Data Stream for every database table you wish to connect with Rockset. See Best Practices for more information.
Step 2.1 Create an AWS Kinesis Stream
Create an AWS Kinesis Stream here.
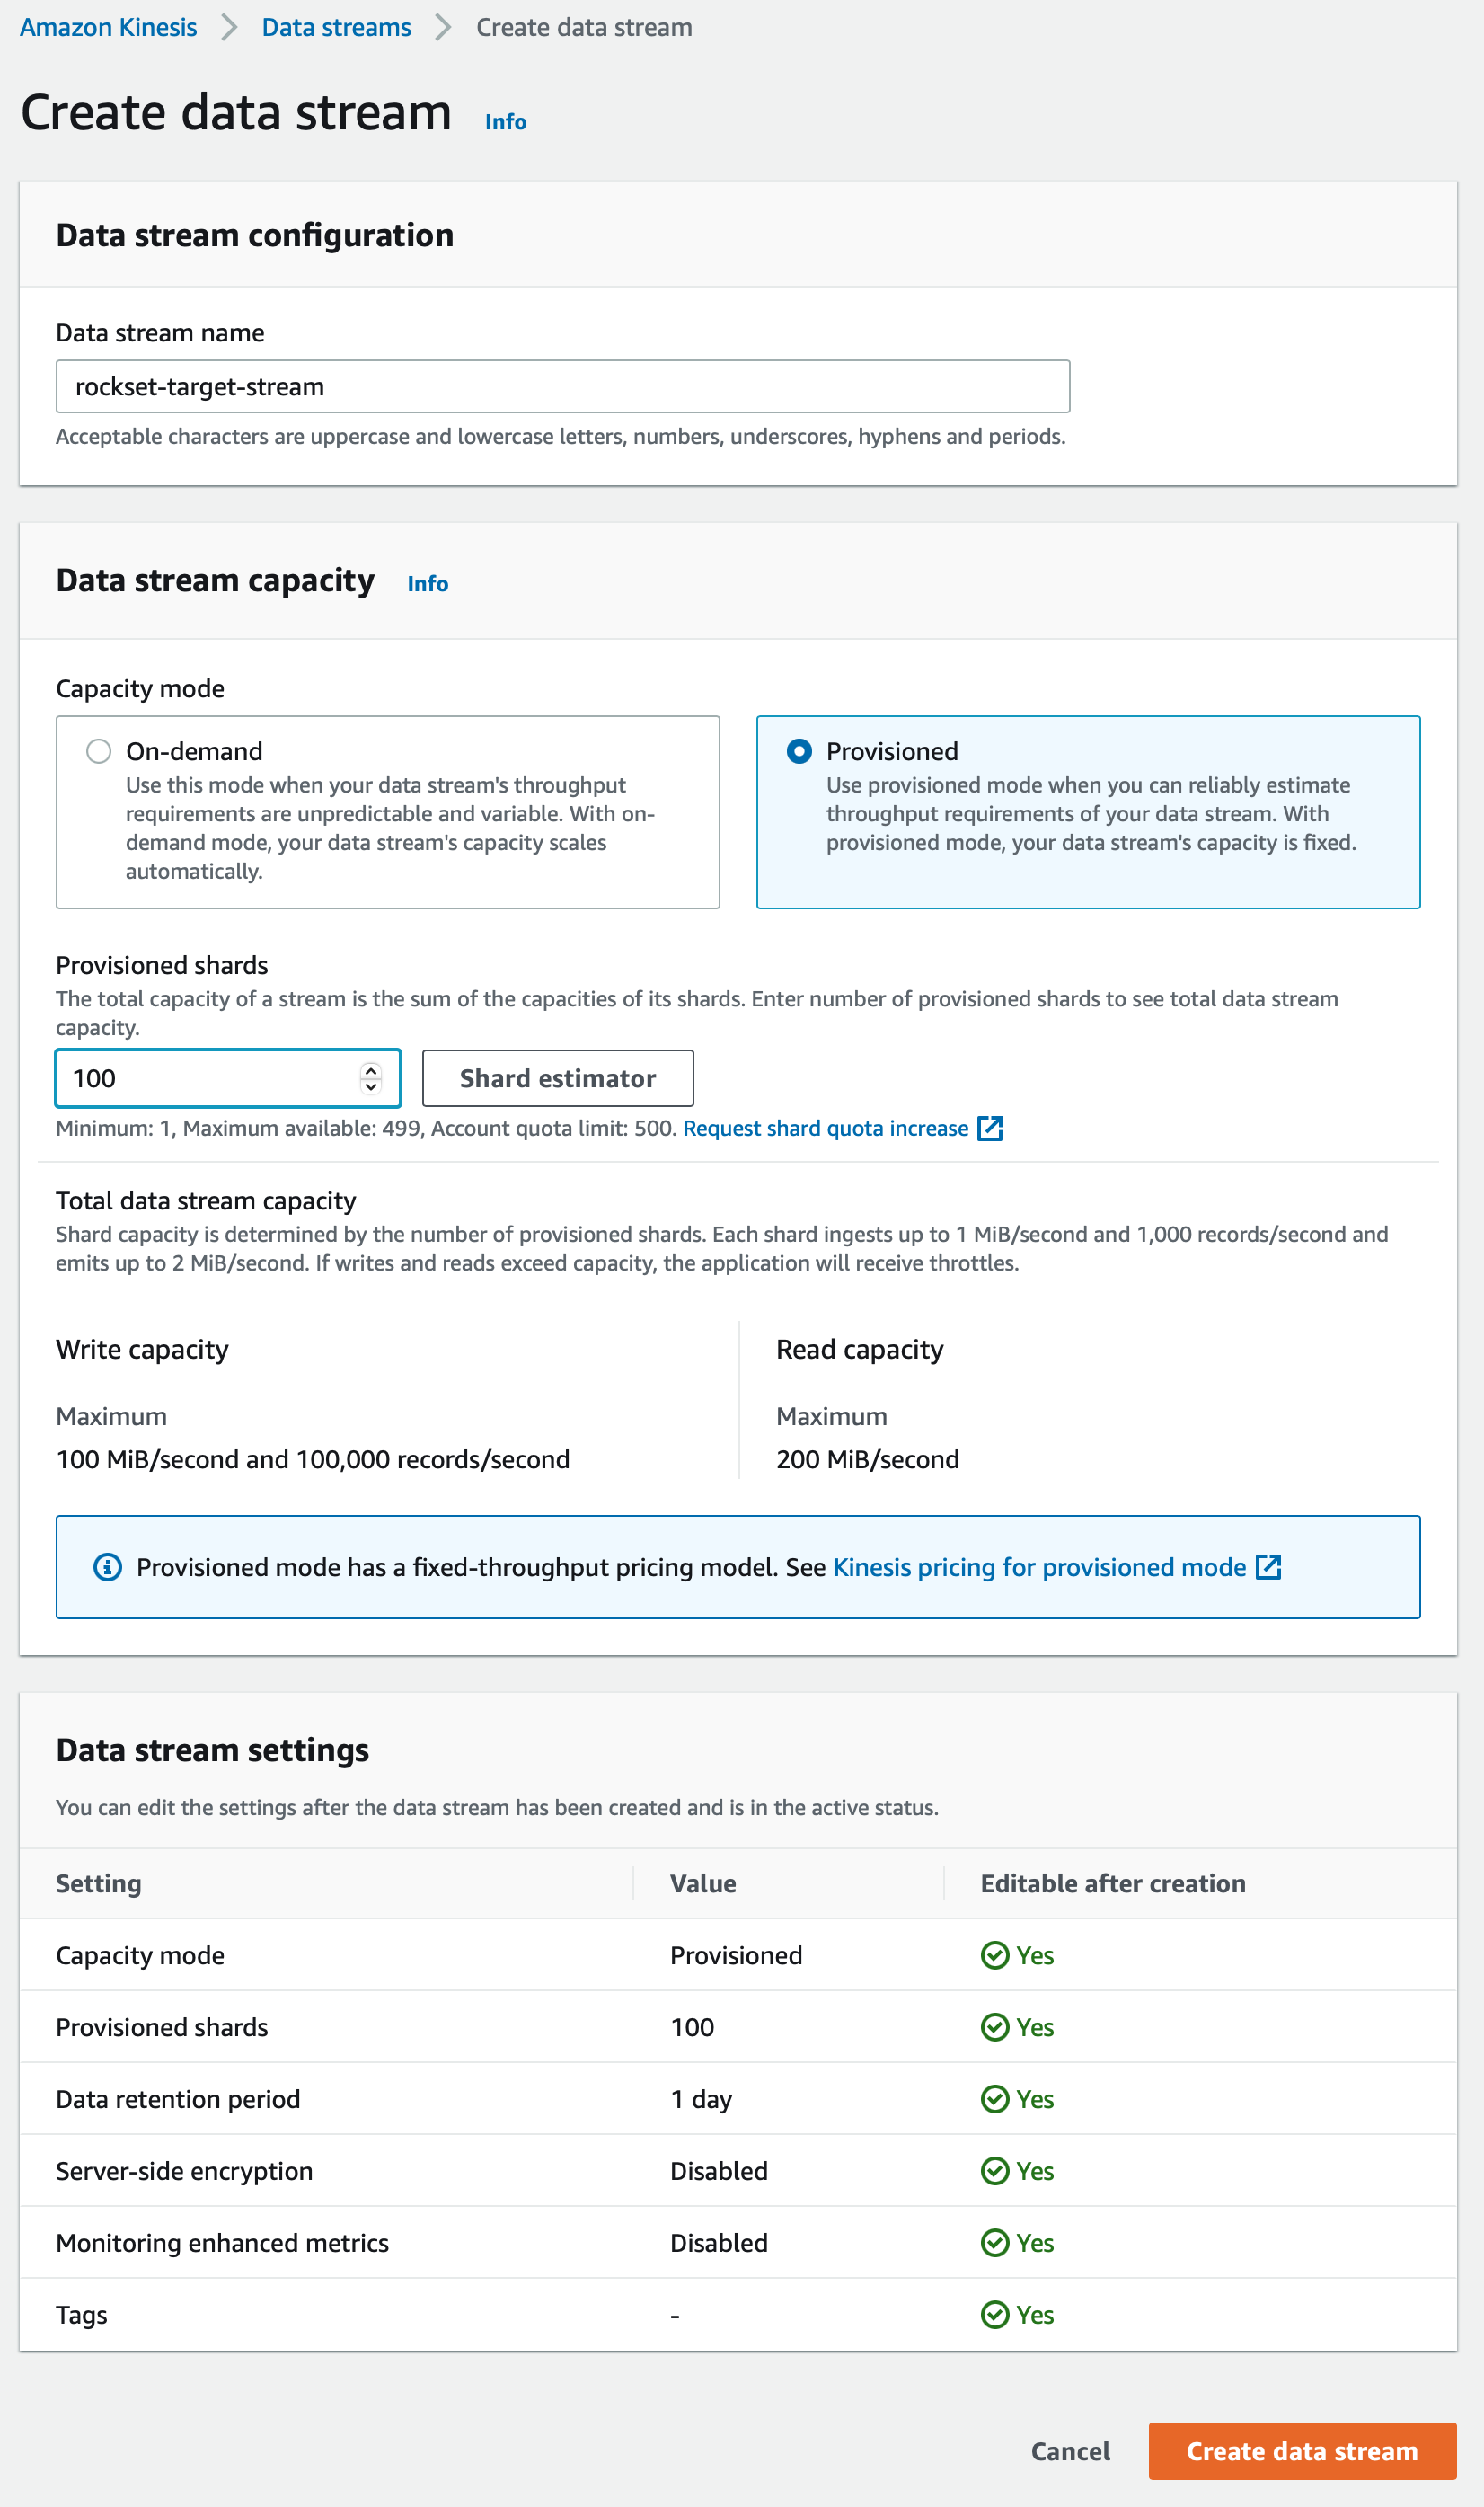
If you select the Provisioned data stream capacity mode, choose a shard count that aligns with the maximum ingest rate of your Virtual Instance size. See Virtual Instances for information on Virtual Instance ingest rates and sizing. AWS Kinesis Shard limits can be found here. If you are not able to estimate the number of shards to configure here, please contact your Rockset solutions architect or customer support.
If you select the On-demand data stream capacity mode, Rockset will dynamically adjust ingest rate to match the number of shards, up to your Virtual Instance ingest rate limit.
Step 2.2 Create a Role for AWS Kinesis Stream
You will need to create a role that has the correct PutRecord, PutRecords, and DescribeStream permissions to access Kinesis. To create this role, please follow these instructions.
Step 3: Setup your AWS Data Migration (DMS)
AWS DMS setup is a multi-step process. First, you have to create one or more DMS Replication Instances. Each Replication Instance comes with a set of resources that power the data migration from Oracle to Kinesis. Then you will create a DMS Source Endpoint for each Oracle database. You will then create one DMS Destination Endpoint for each of the Oracle database table that you want to connect with Rockset. The Source Endpoint is used to configure the name of the Oracle database and the Destination Endpoint specifies the name of the corresponding Kinesis stream. Finally, you will configure a Database Migration Task that specifies the Oracle table names that you want to connect with Rockset. The creation of a Database Migration Task actually starts the migration of data from a specific Oracle table to the corresponding Kinesis stream.
Step 3.1 Create a DMS Replication Instance
AWS DMS uses a replication instance to connect to your source data store, read the source data, and format the data for consumption by the target data store. A replication instance also loads the data into the target data store. Most of this processing happens in memory; however, large transactions might require some buffering on disk. Cached transactions and log files are also written to disk. You can create a Replication Instance by using the AWS Console as follows:
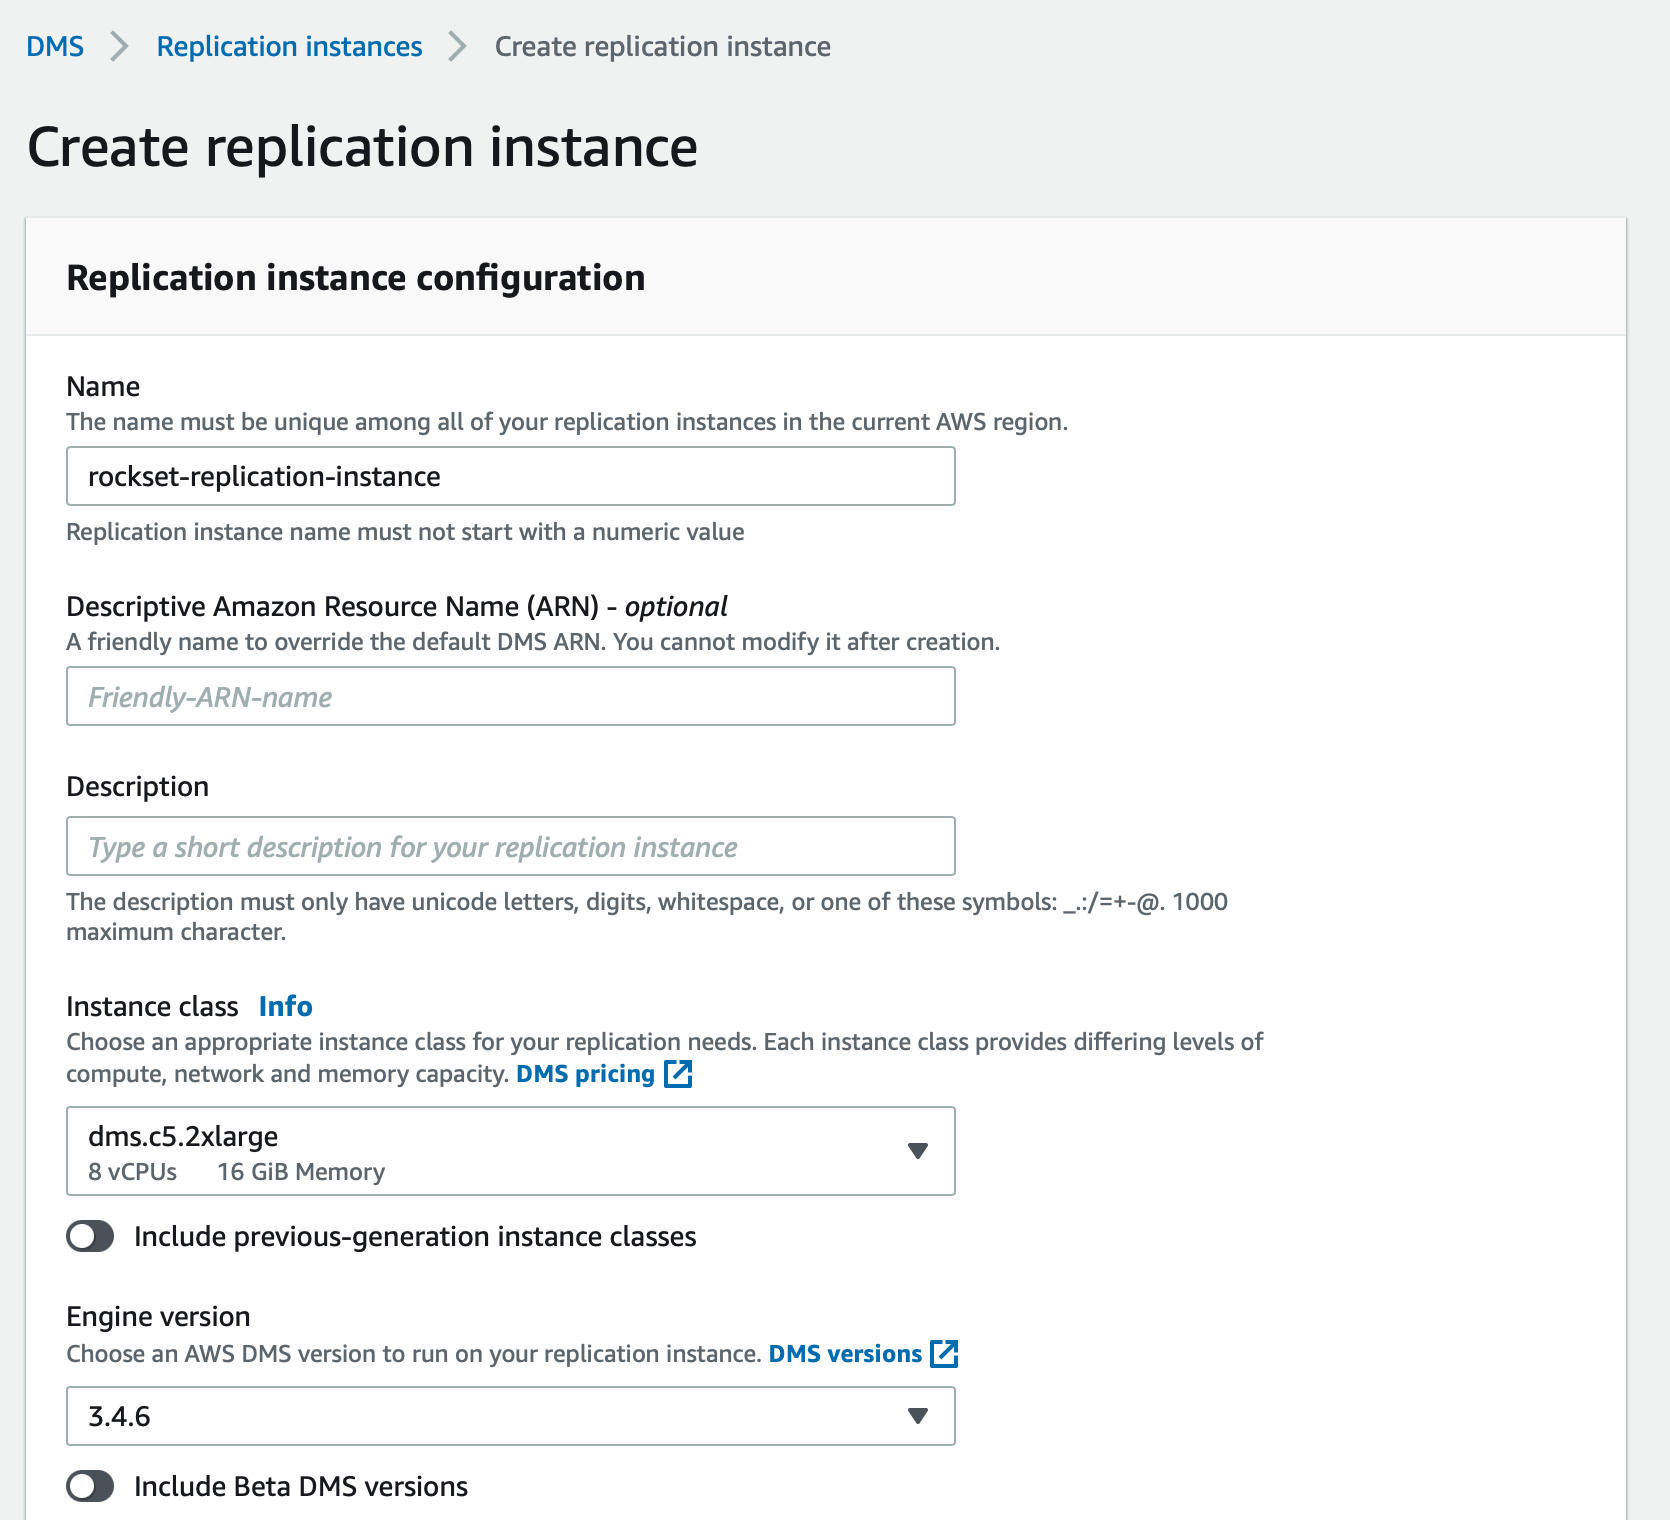
The Instance class specifies the amount of resources provisioned for this replication instance. You can pick the Instance class based on the total amount of data to be migrated and how quickly you want the replication process to occur, although we recommend an Instance class of dms.c5.2xlarge or larger to ensure optimal performance during data ingest. While all versions of DMS Replication Instances should theoretically work for this process, we recommend using versions 3.4.7 or earlier as some recent versions may be occassionally unstable when tailing CDC streams. Name the replication instance appropriately, especially if you are creating multiple replication instances.
Step 3.2 Create a DMS Source Endpoint for your Oracle database
A Source Endpoint specifies the location and access information of your Oracle database. You use the AWS Console to create a DMS Source Endpoint as follows:
- Pick the RDS instance name for the Oracle database.
- Pick an appropriate name for this Endpoint. You can specify access parameters by clicking on “Provide access information manually", and entering the name database name and port of the Oracle database. You can use the Oracle user
aws-dmsand password that you had created in Step 1.1.
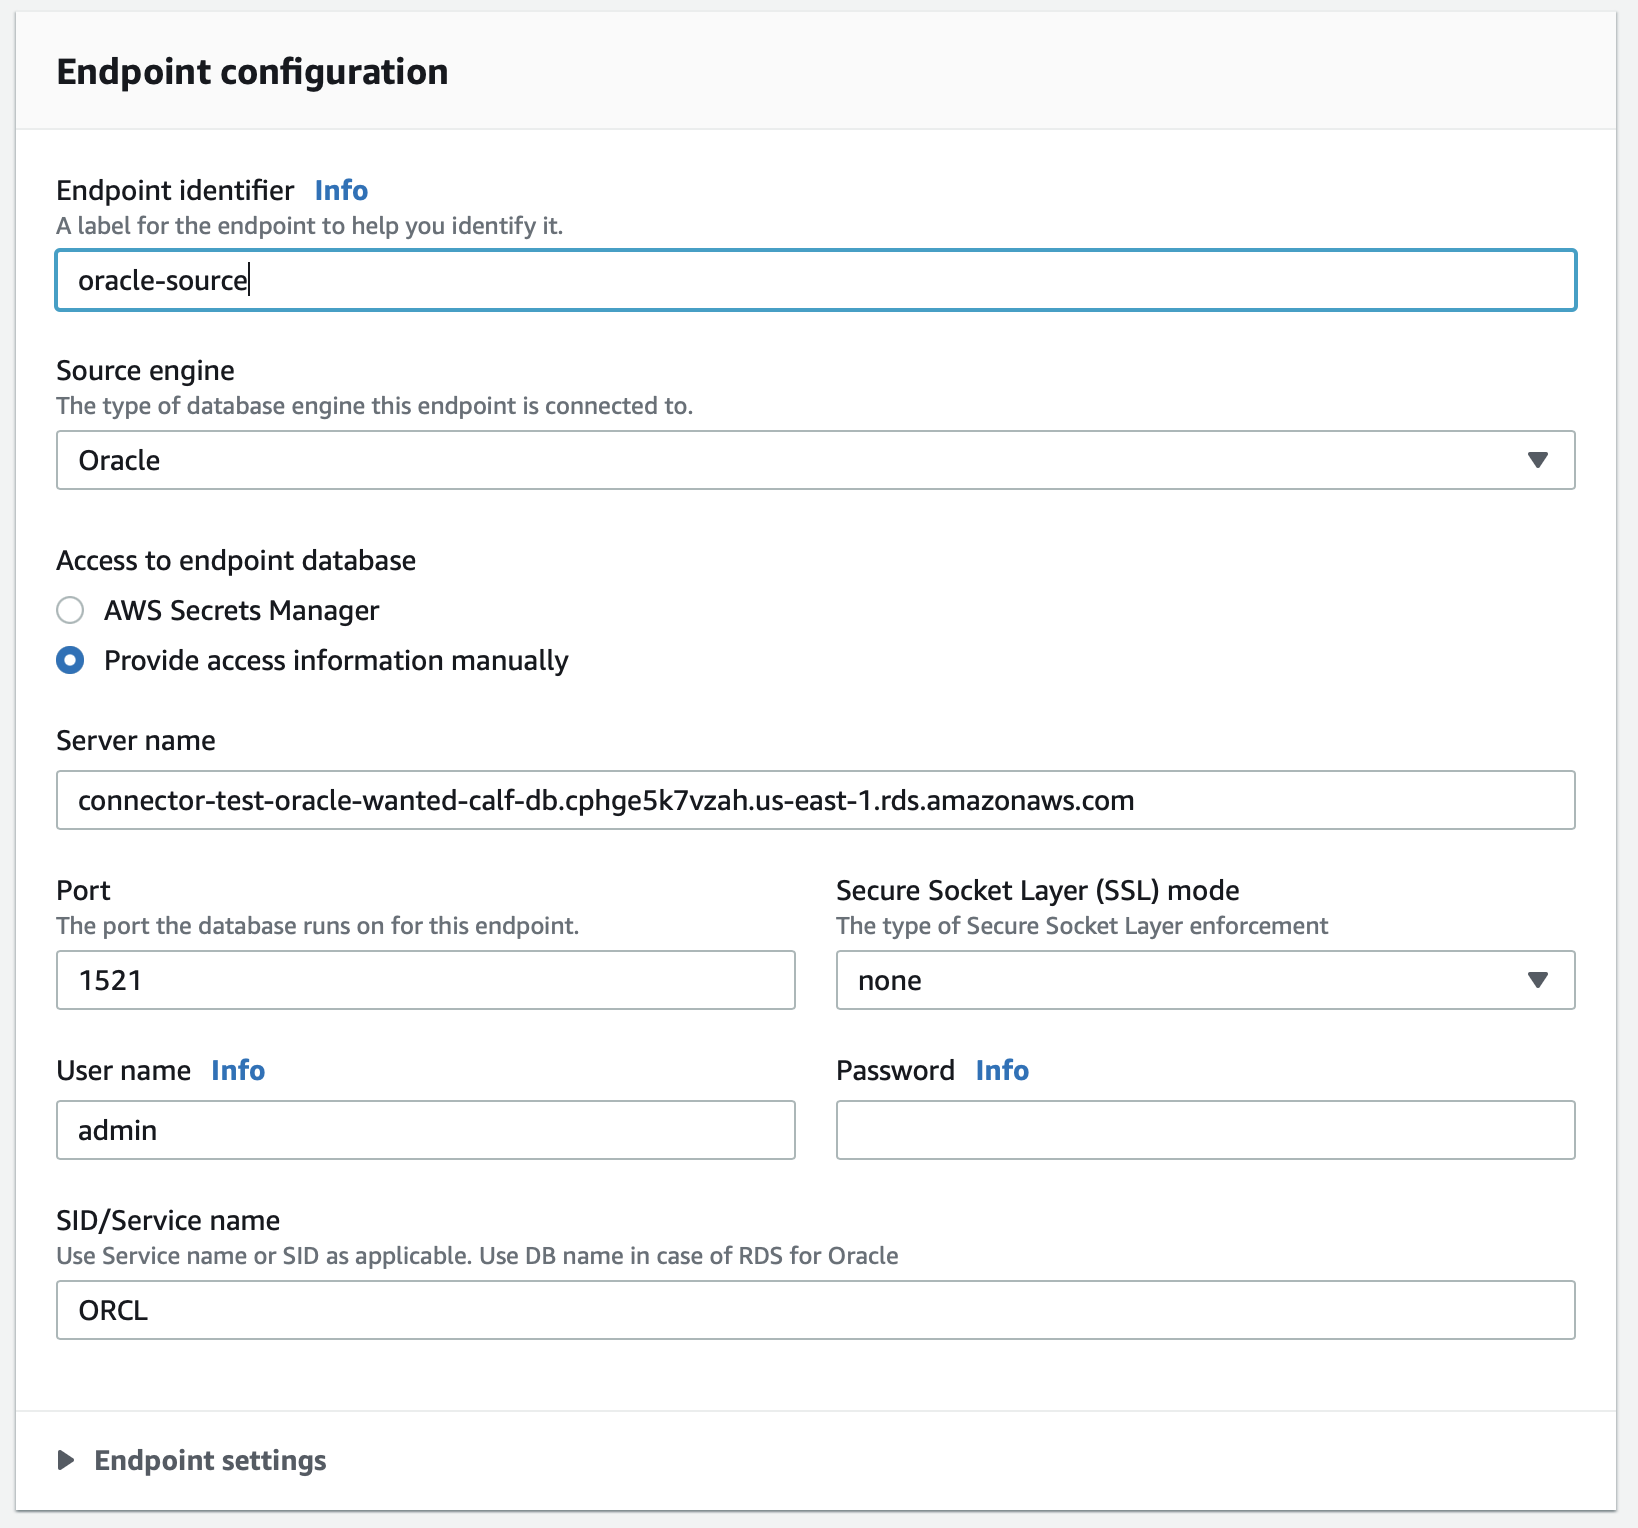
If you want multiple Oracle database tables in a single Oracle database to be connected to Rockset, you only need to create a single Source Endpoint for that database. The same Source Endpoint can then be used by multiple Migration Tasks in a later step. You can click on the “Test endpoint connection (optional)” tab to verify that the access configurations to access the Oracle database are configured correctly.
AWS DMS versions 3.4.7 and later require that you configure AWS DMS to use VPC endpoints to all your source and target endpoints that interact with certain Amazon Web Services. Click here to configure VPC endpoints as AWS DMS source and target endpoints.
Step 3.3 Create a DMS Target Endpoint for every Oracle database table
The DMS Target Endpoint specifies the name of the Kinesis Stream that is the target of a migration task. Create a DMS Target Endpoint as follows:
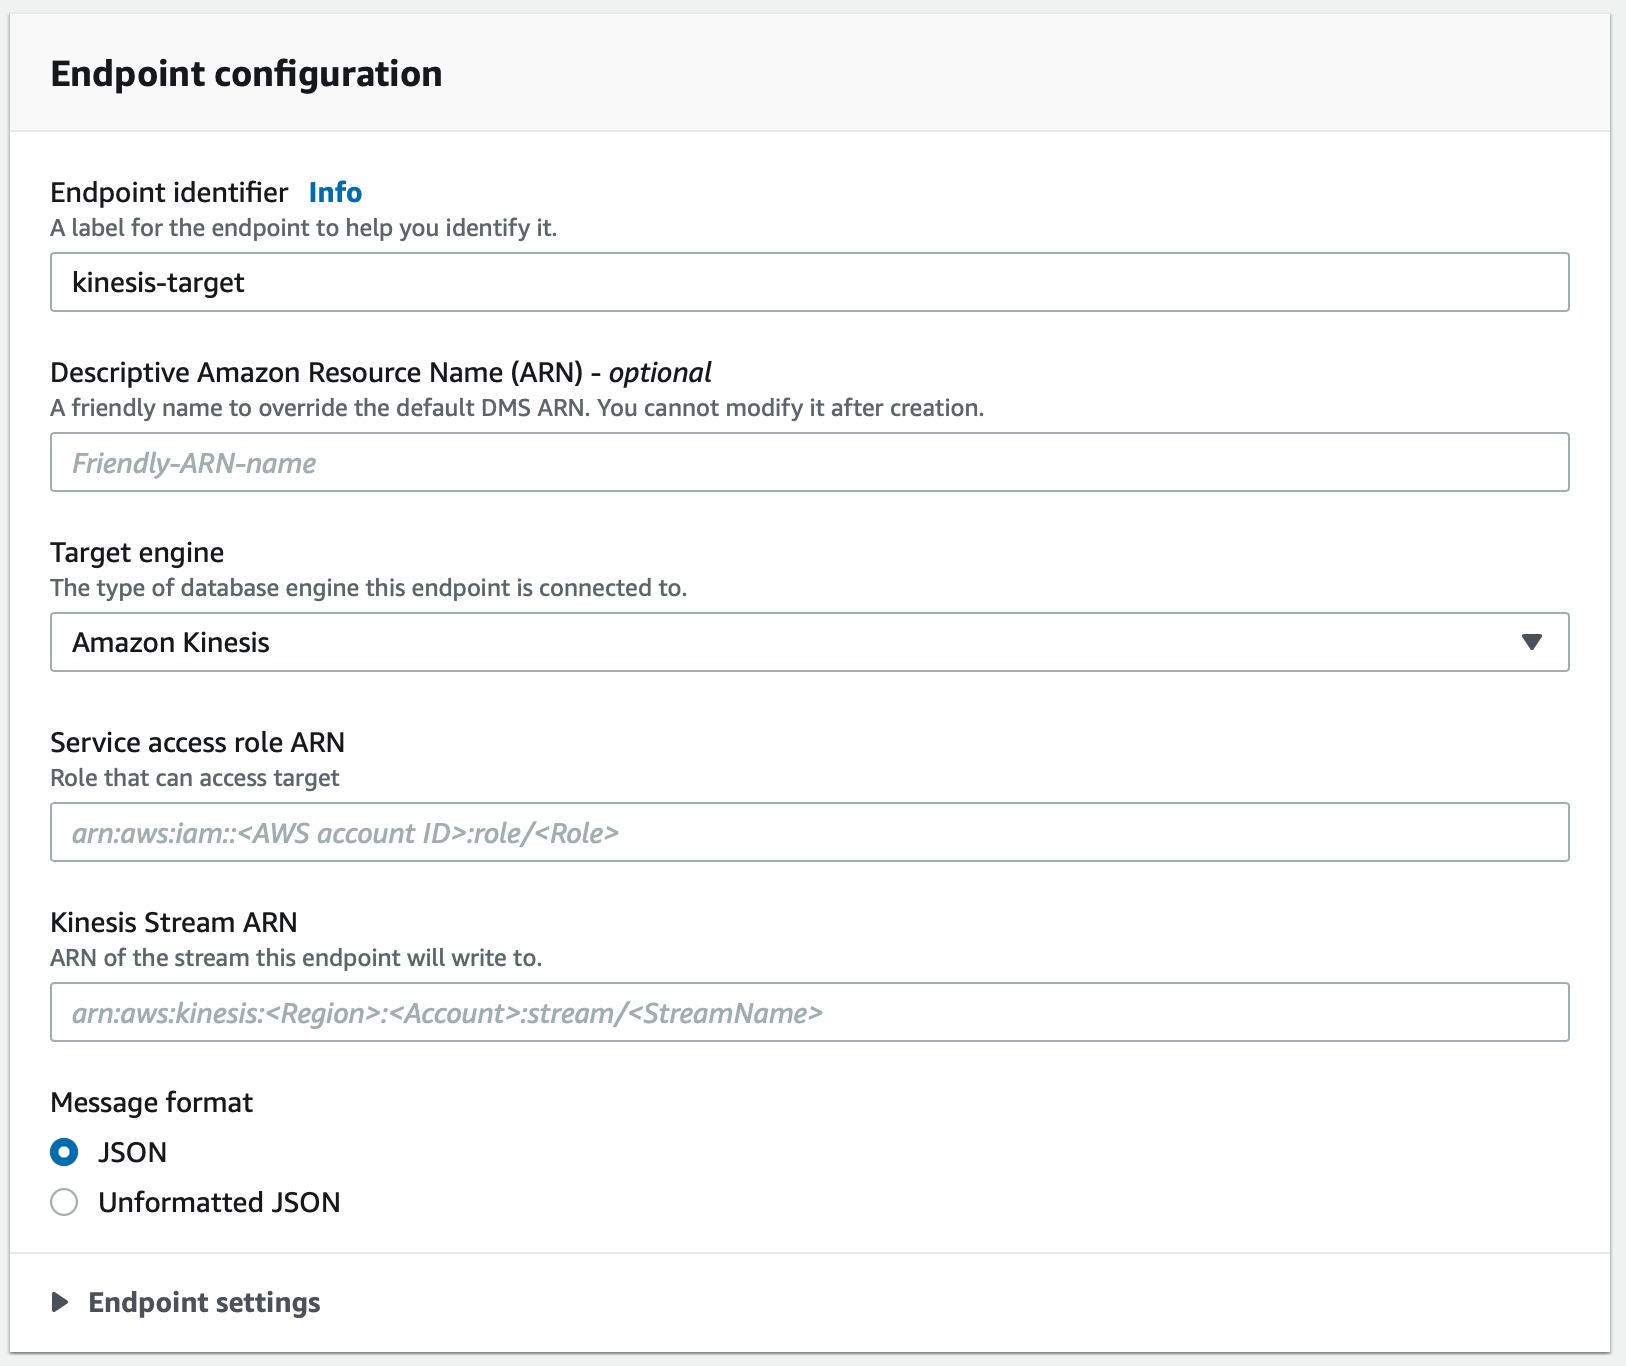
Pick Amazon Kinesis as the Target Engine. Enter the ARN of the Kinesis Stream created in Step 2.1 in the Kinesis Stream ARN field. Additionally, enter the Service access role ARN of the role created in Step 2.2.
Again, AWS DMS versions 3.4.7 and later require that you configure AWS DMS to use VPC endpoints to all your target endpoints. Follow these instructions to configure VPC endpoints.
You can click on the “Test endpoint connection (optional)” tab to verify that the access configurations to access the Kinesis Stream service are configured correctly.
Step 3.4 Create a DMS Database Migration Task to migrate a Oracle table to a Kinesis Stream
A Migration Task connects one specific Oracle database table on a specific Oracle database to a specific Kinesis Stream. Use the AWS Console to specify the following:
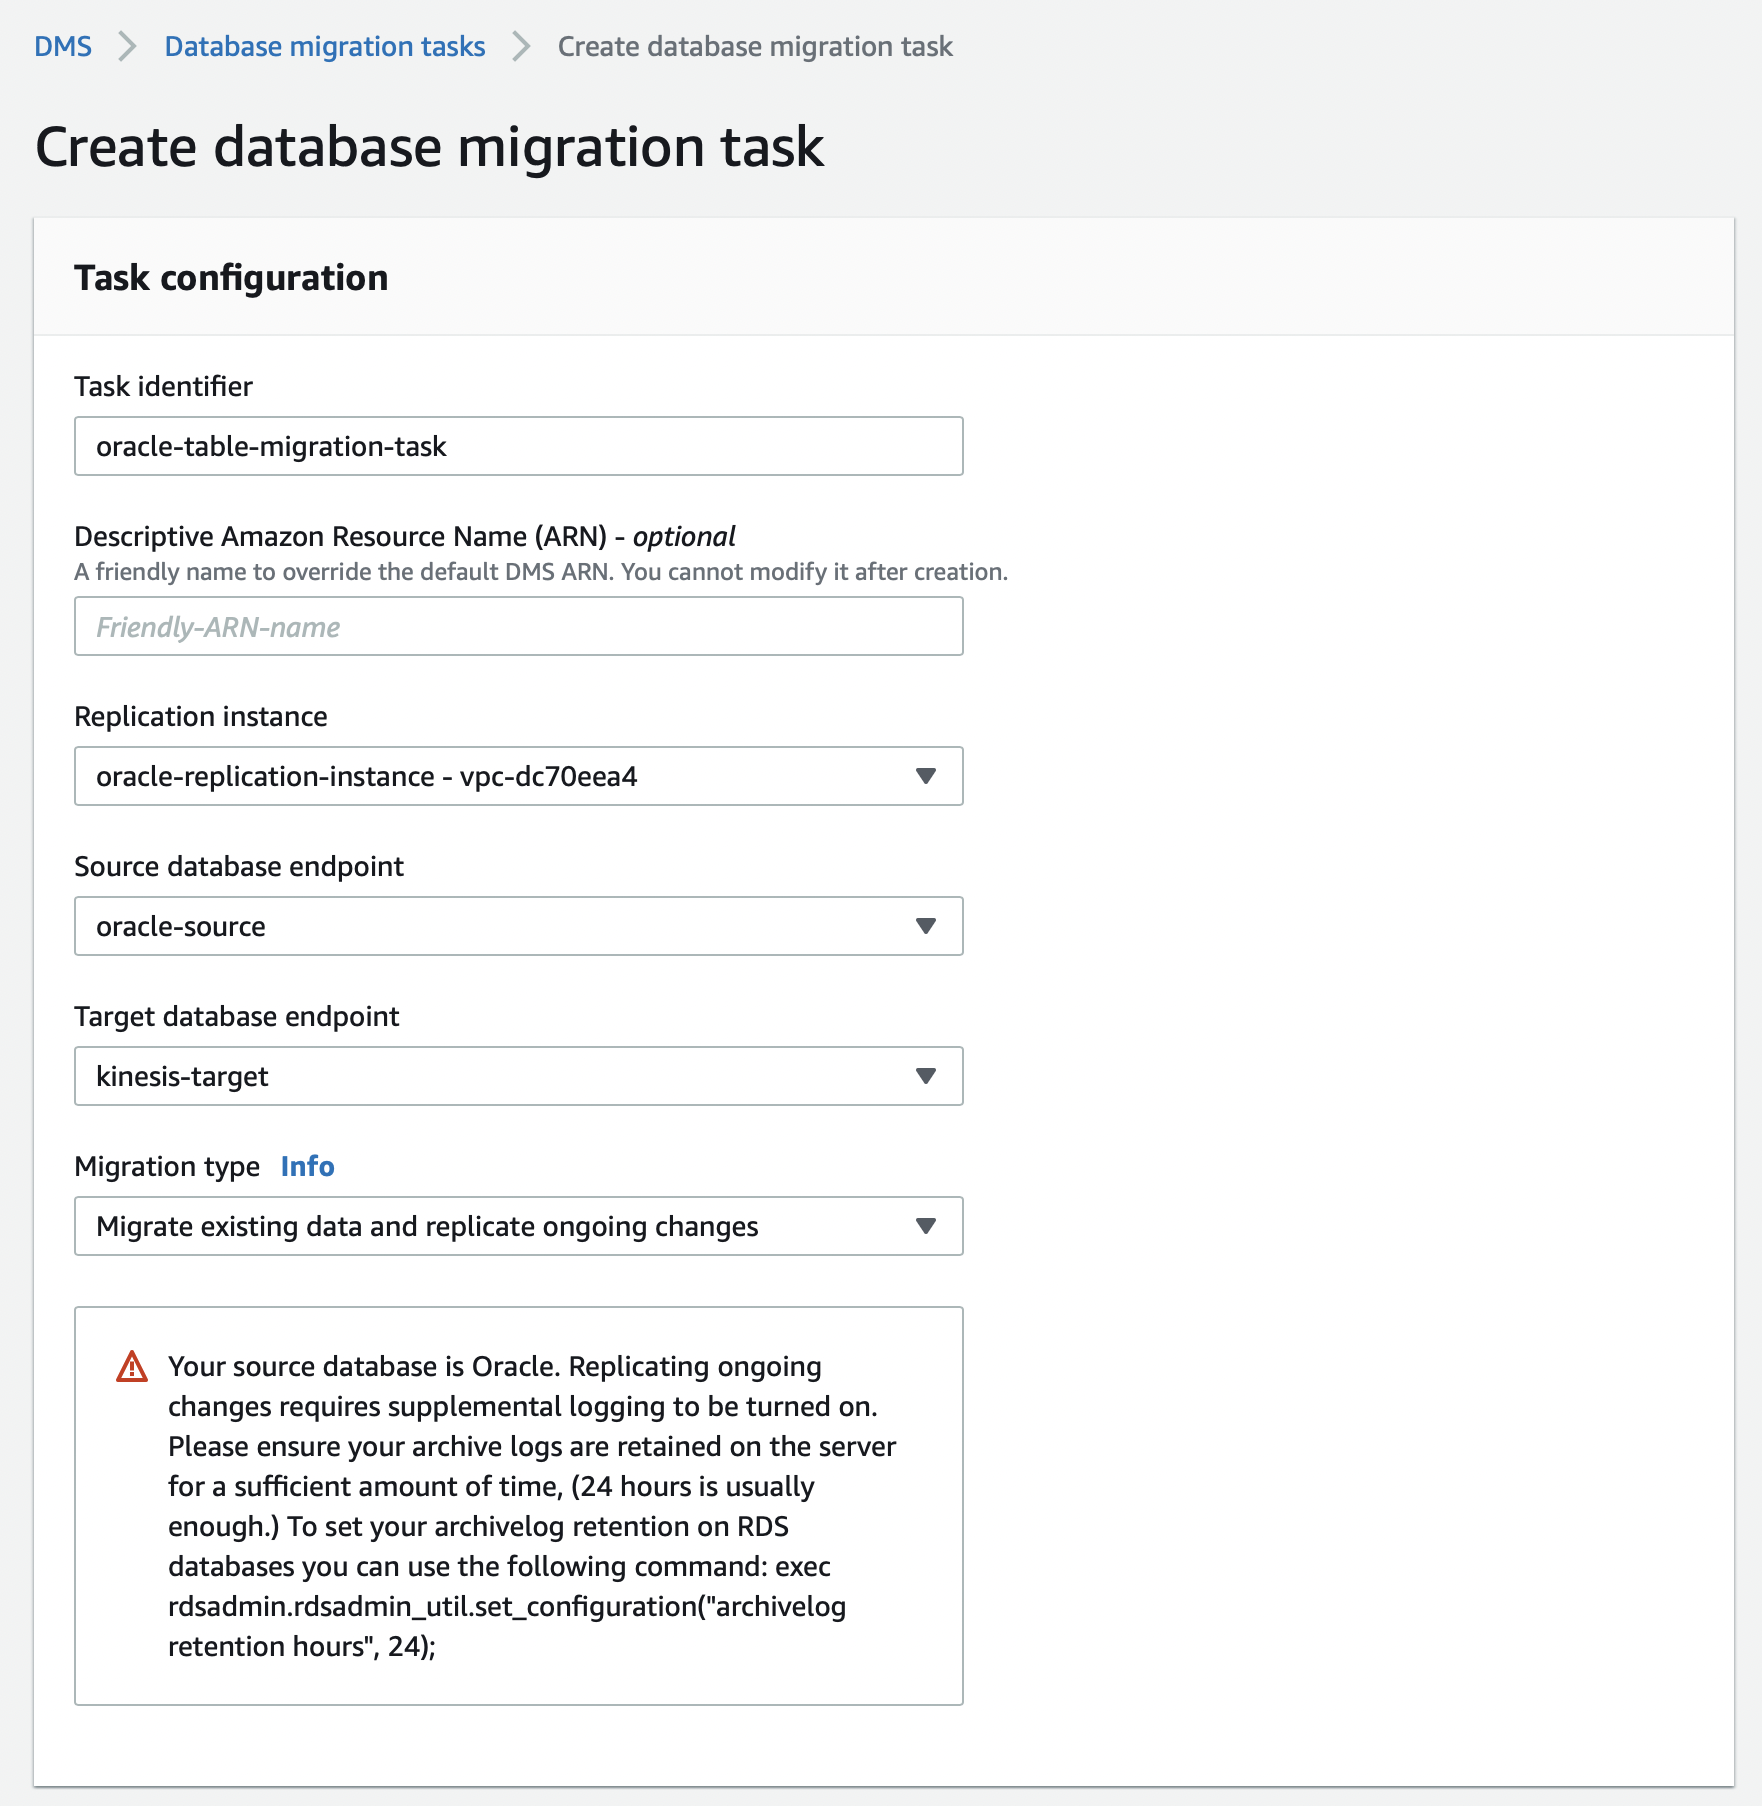
Pick the option for Migration type as “Migrate existing data and replicate ongoing changes”. This option does a full dump of the Oracle database table to Kinesis first, followed by continuous replication through Oracle CDC using the same Kinesis Stream. Specify the following task settings:
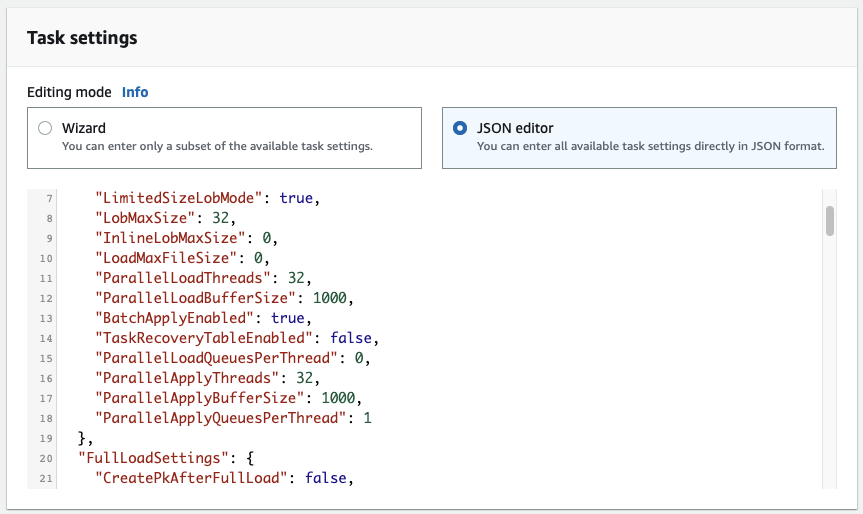
Configure these DMS configuration settings as required if you are working with a large table or if your update rate to your table is high.
"TargetMetadata": {
  "ParallelLoadThreads": 32,
  "ParallelLoadBufferSize": 1000,
  "BatchApplyEnabled": true,
  "ParallelApplyThreads": 32,
  "ParallelApplyBufferSize": 1000,
  "ParallelApplyQueuesPerThread": 128,
  "ParallelLoadQueuesPerThread": 128,
}.
"FullLoadSettings": {
  "CommitRate": 50000,
  "MaxFullLoadSubTasks": 49,
},
The name of the Oracle table that you want to migrate is specified in the section titled Table Mappings. Note that if you are migrating data from a partitioned table in Oracle, you must specify the partition table name(s) in your selection rule rather than the parent table name. You must create a selection rule with the appropriate Table name field for each partition in the partitioned table.
Here is an example where a table named customers is being configured:
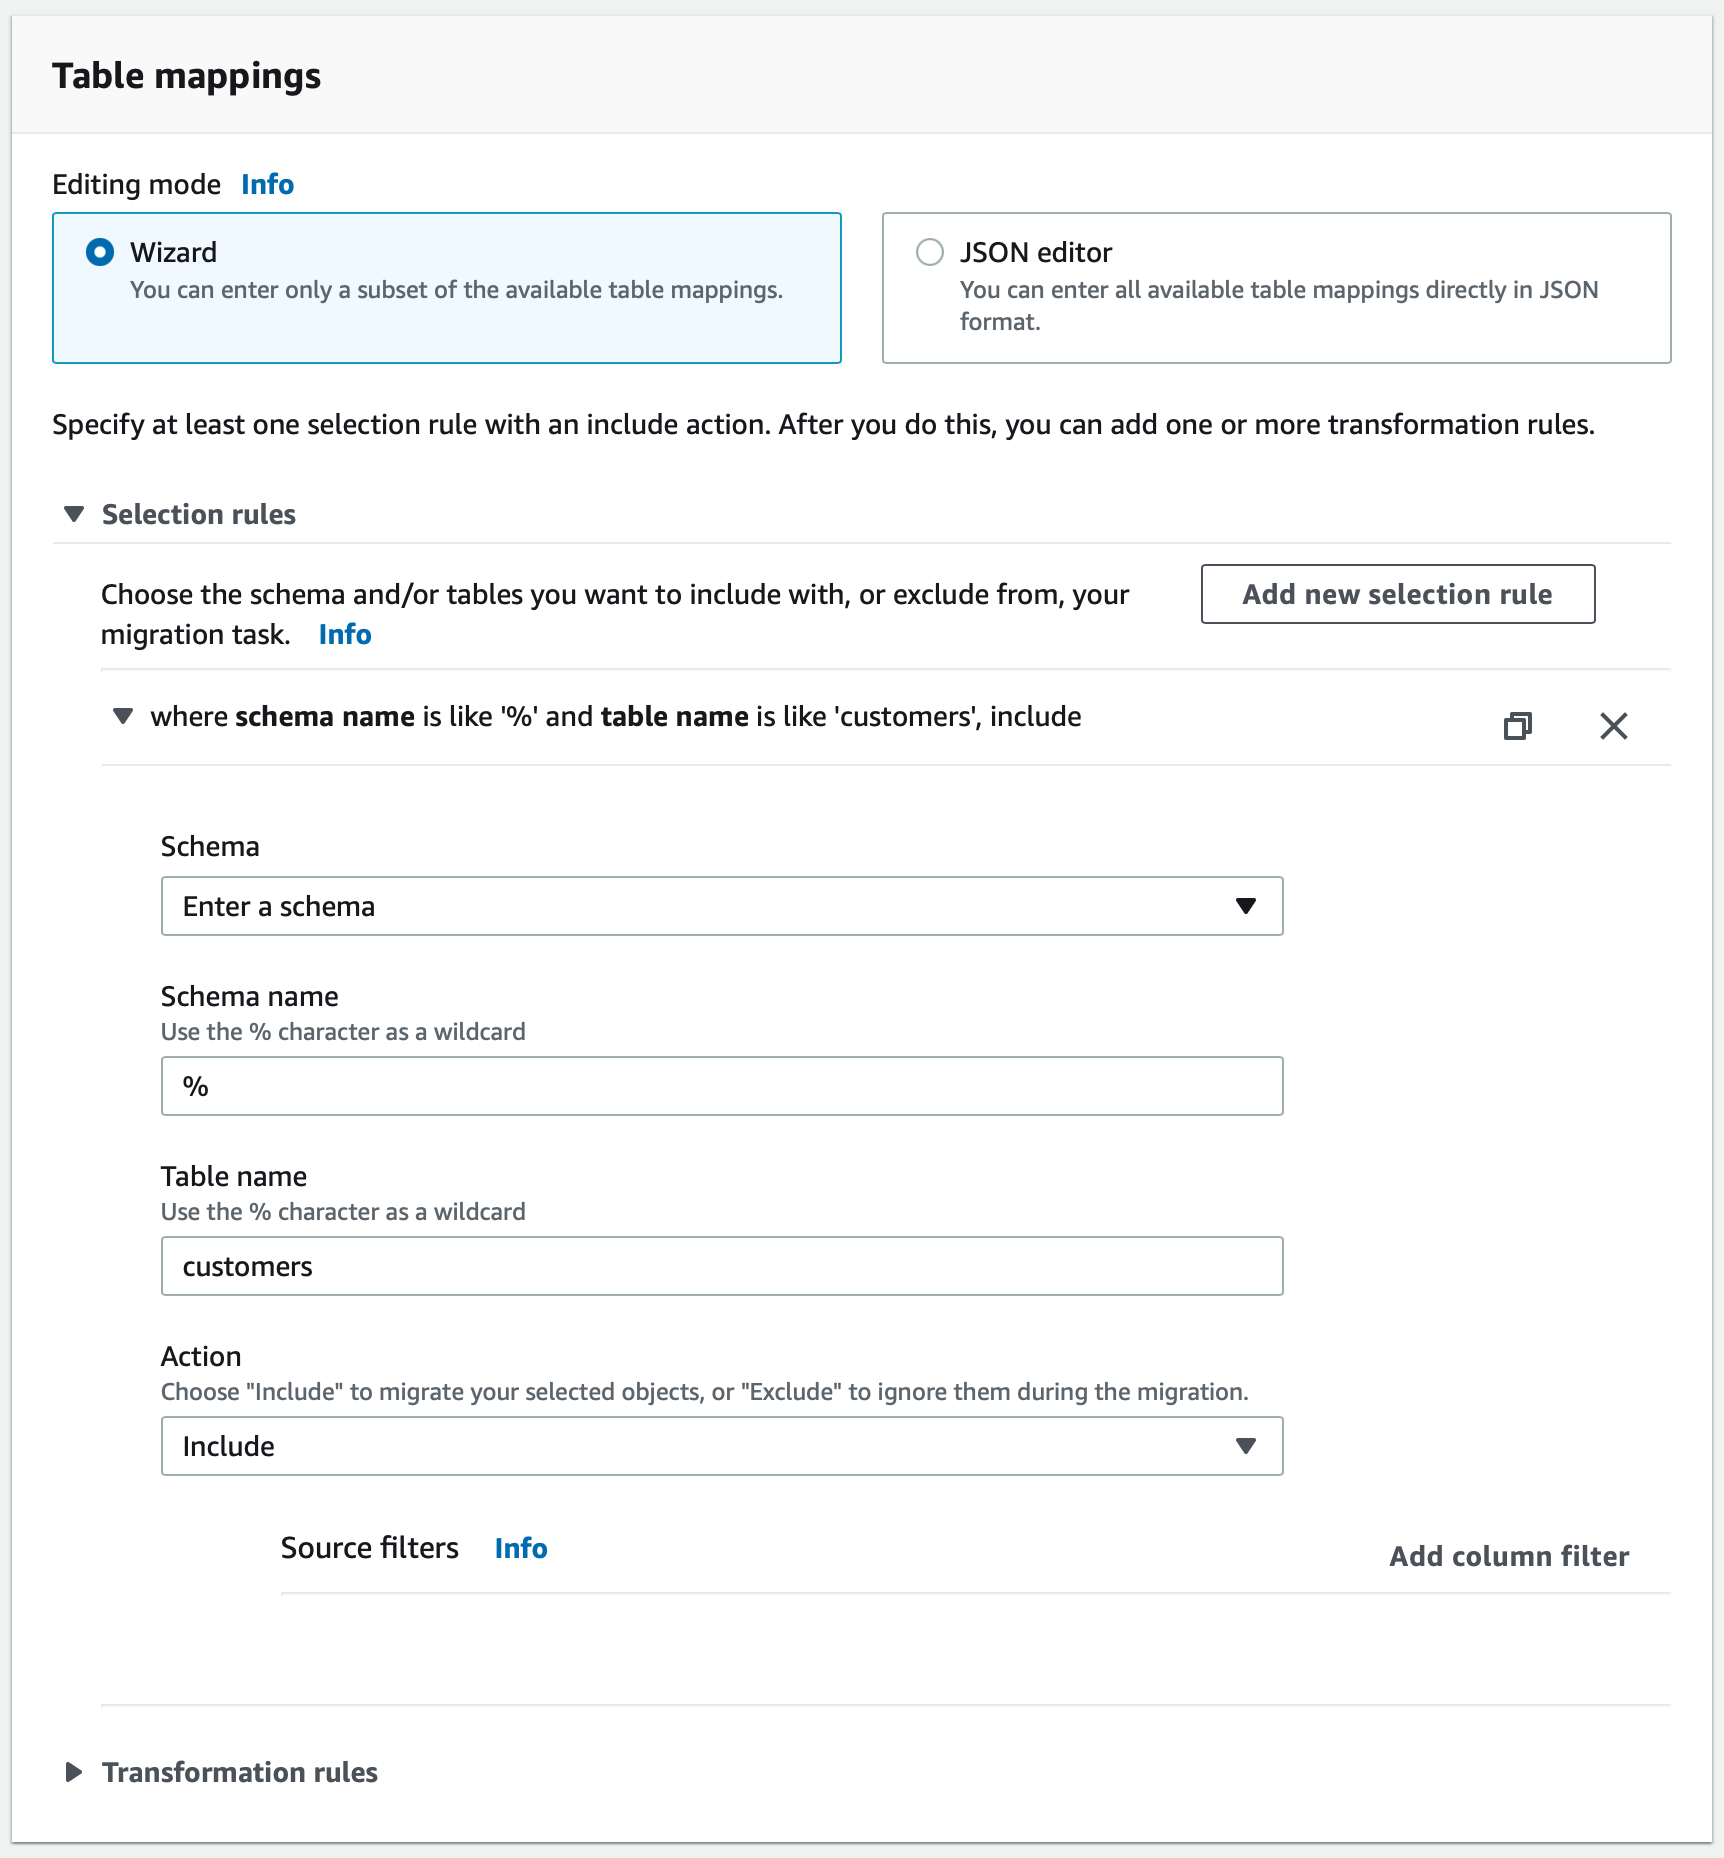
You can switch on Pre-migration assessment to verify that the settings are accurate. If you switch on the assessment then remember to manally start the task once the pre-migration assessment is complete.
Now that you have completed steps 1-3, you are ready to create the Rockset Kinesis integration.
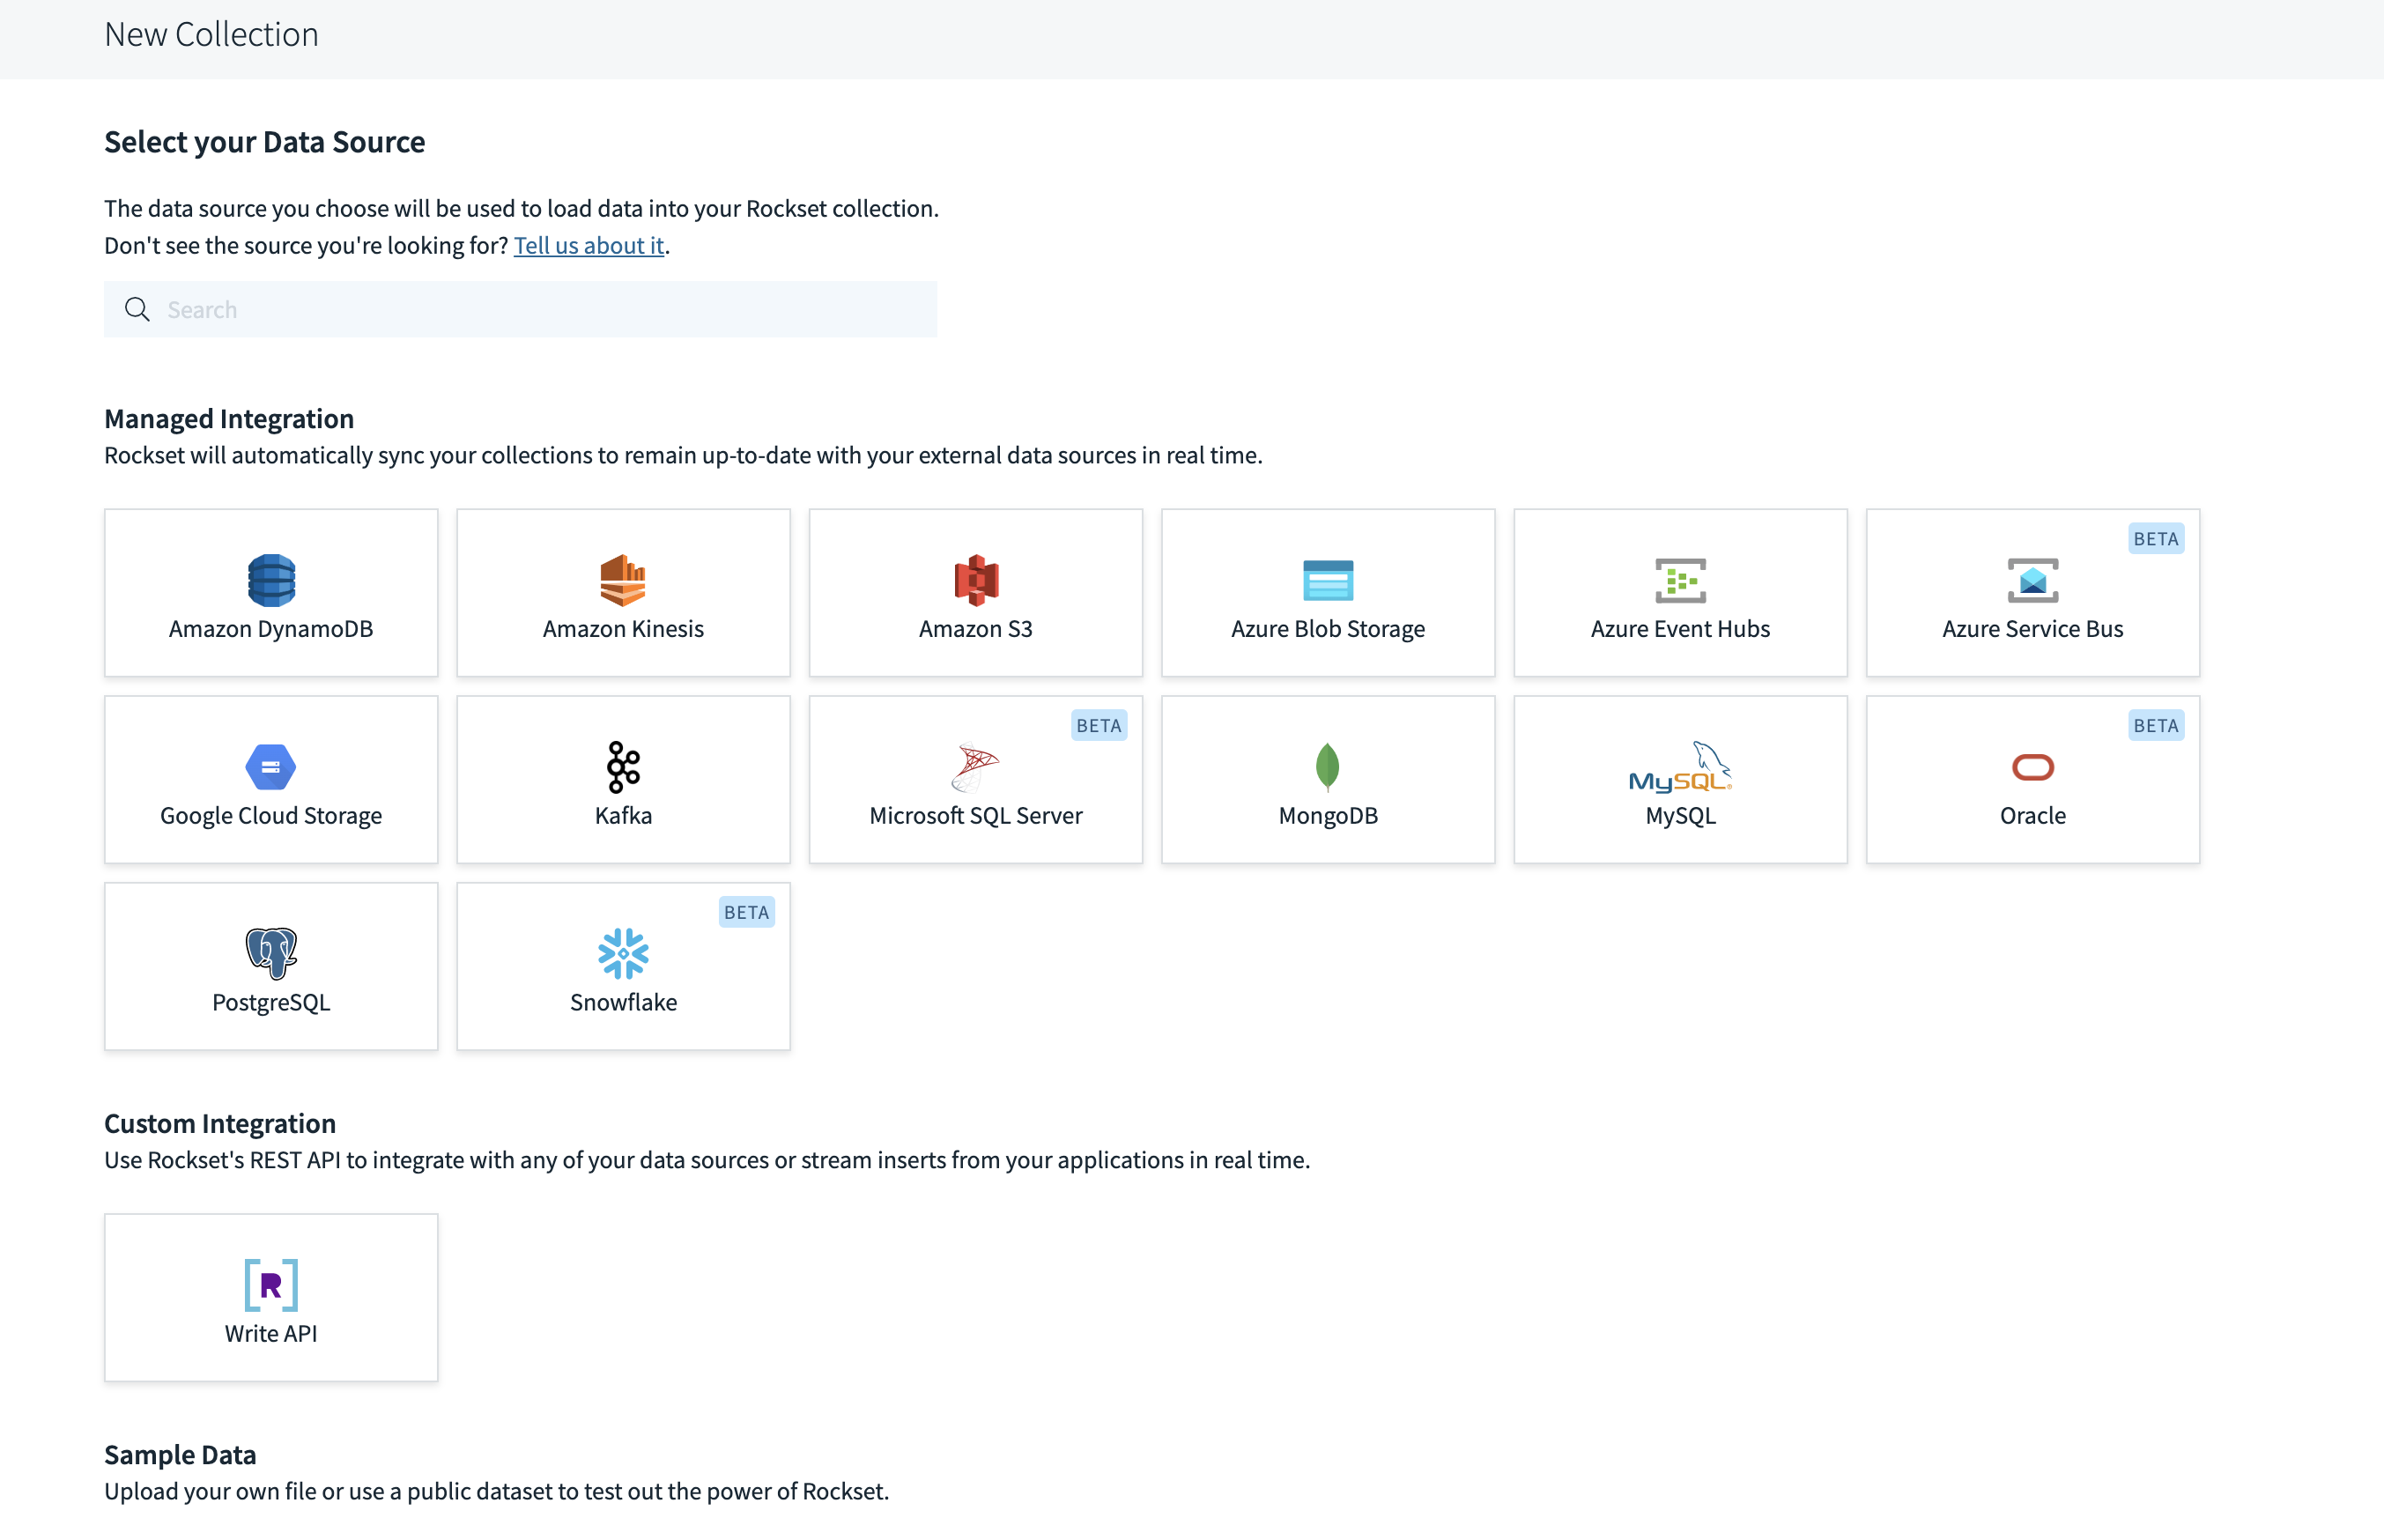
Creating a Rockset Collection
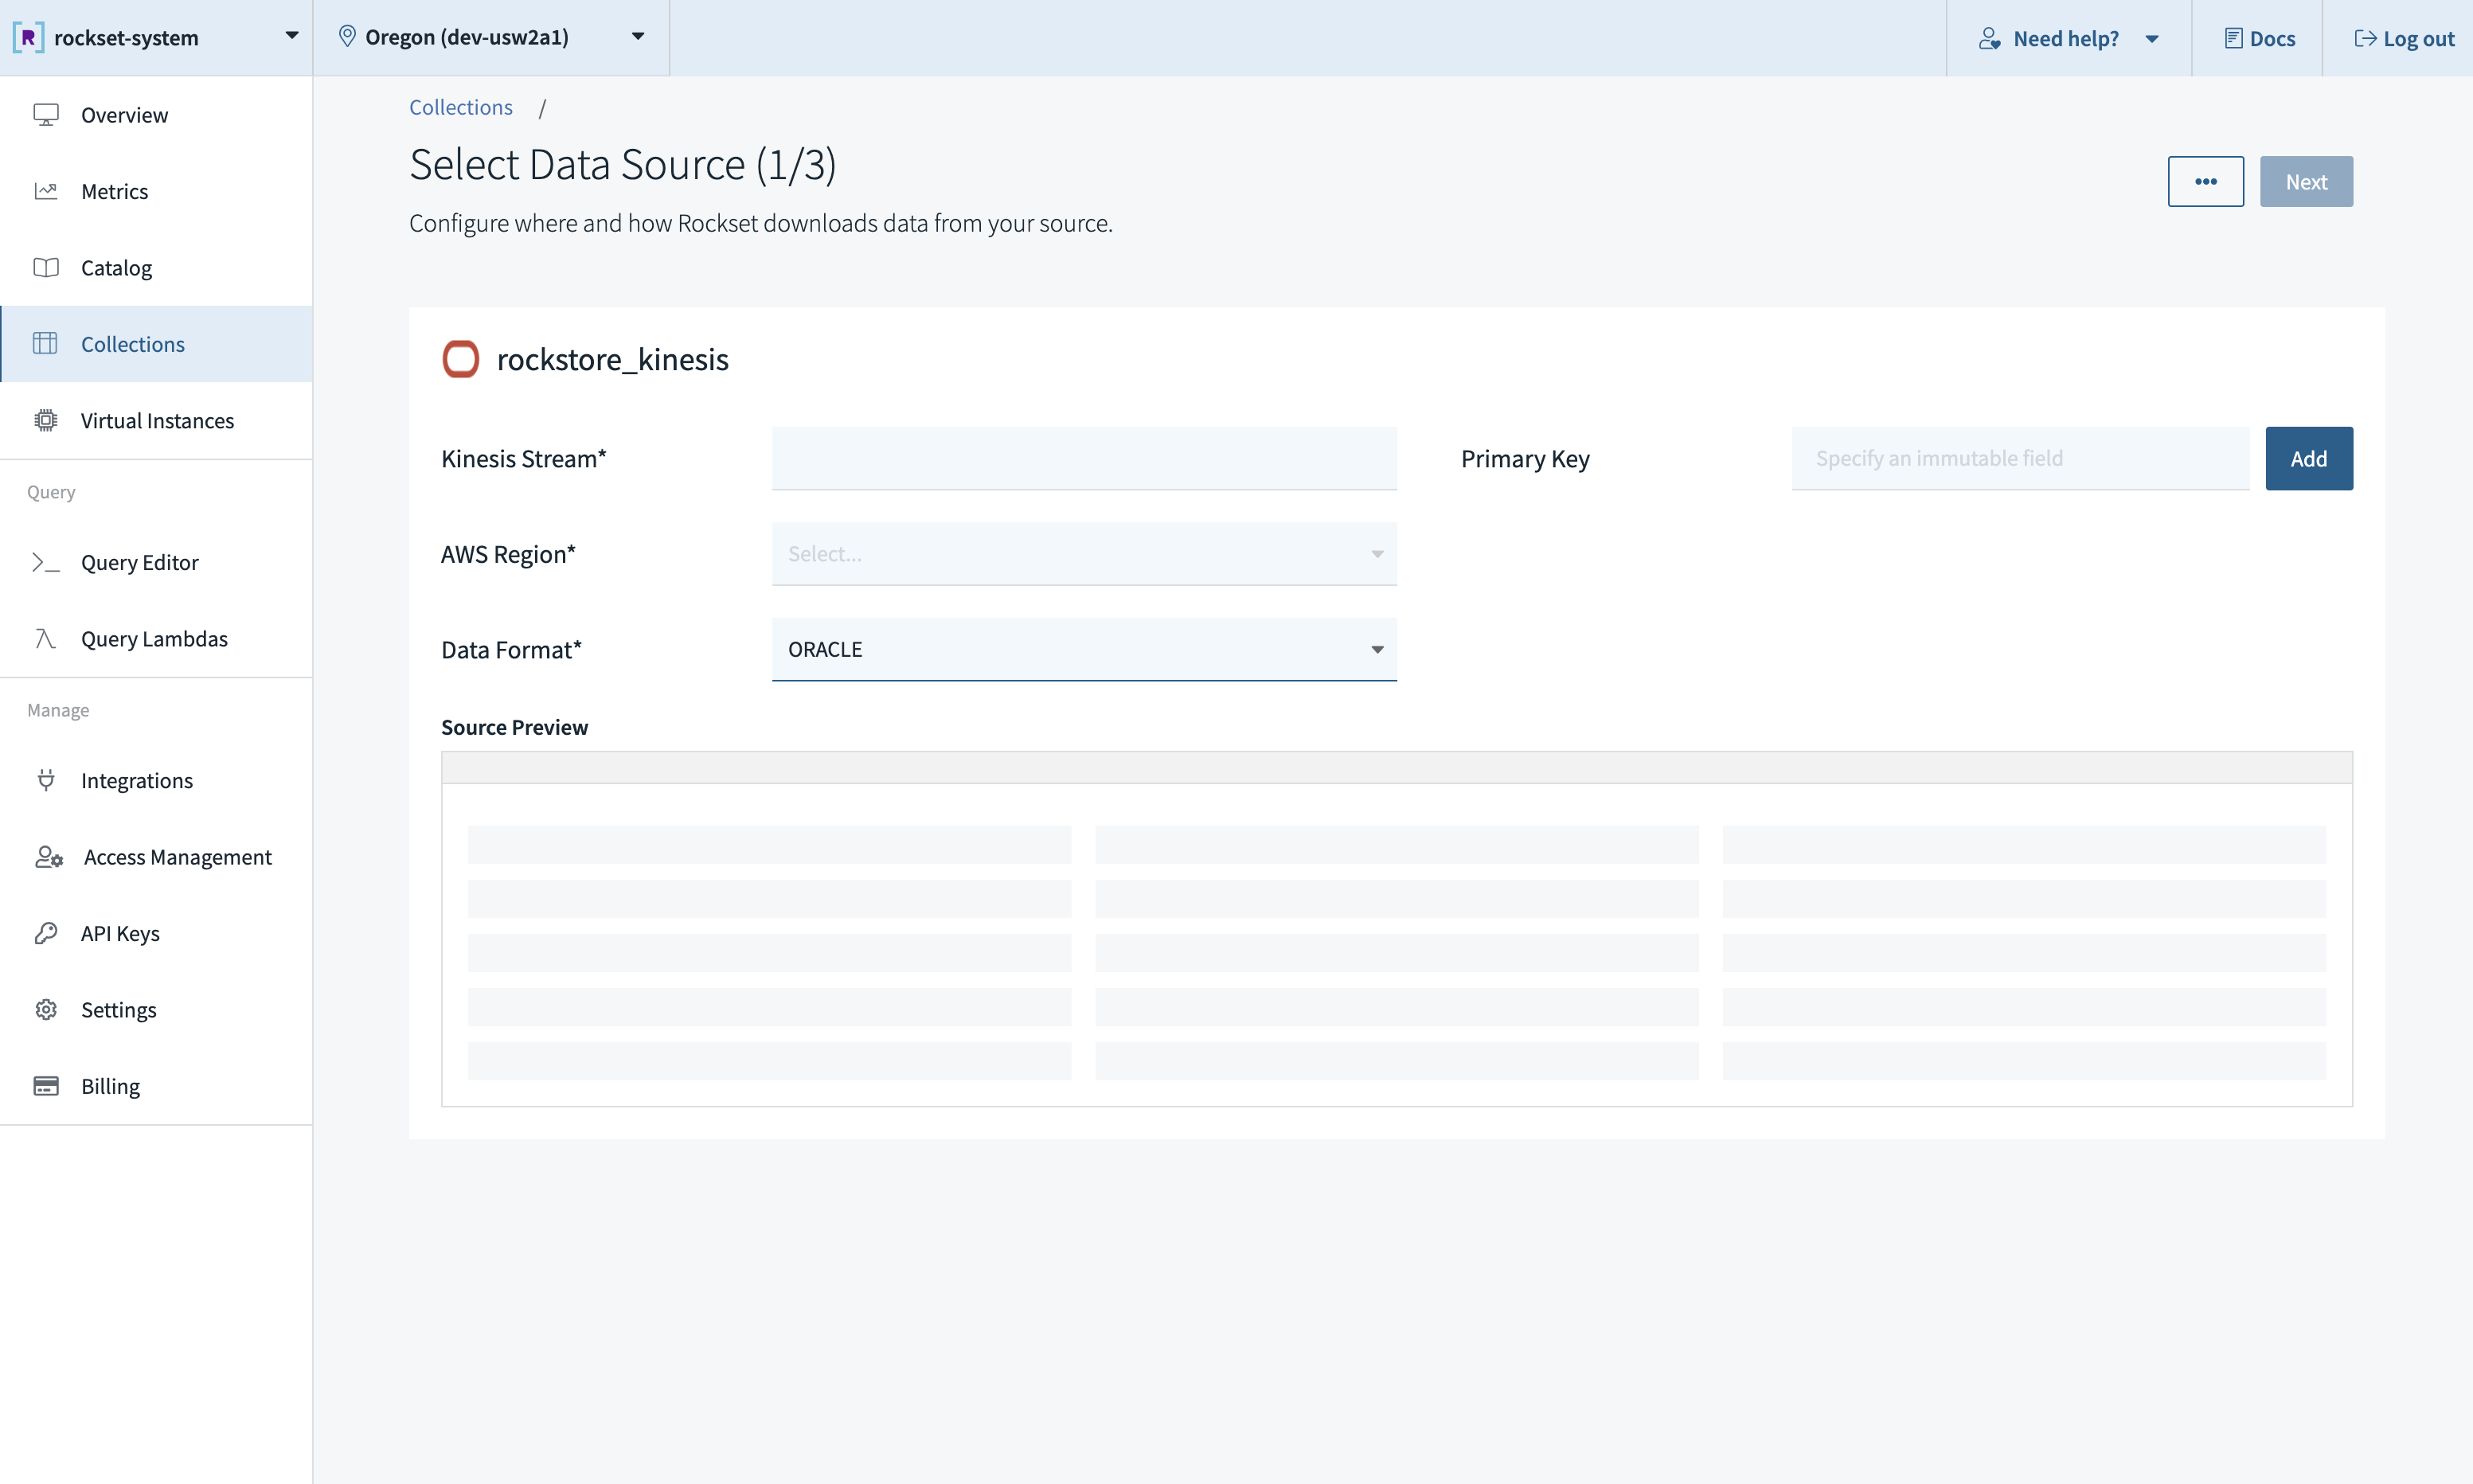
- Navigate to the Collections page in the Rockset Console and select the "Oracle" tile under Managed Integrations. This will guide you through a series of steps to follow to set up the Kinesis Intergration needed to create the collection.
- Populate the fields as shown below. Note that Format must be set to
ORACLE. Also, it is mandatory to specify an immutable primary key from the source Oracle table during collection creation.
Ingesting Complex Types
The following is a table of custom SQL expressions that you can apply to fields as part of your collection's ingest transformation to ingest them with the desired type.
| Oracle Data Type | Supported By DMS | Rockset Data Type | Rockset Ingest Transformation SQL Expression |
|---|---|---|---|
| BINARY_FLOAT | Y | float | None |
| BINARY_DOUBLE | Y | float | None |
| BINARY | Y | bytes | None |
| FLOAT (P) | Y | float | None |
| NUMBER (P,S) | Y | float | None |
| NUMBER | Y | float | None |
| DATE | Y | date | DATE(PARSE_TIMESTAMP('%Y-%m-%dT%H:%M:%SZ', column)) |
| INTERVAL_YEAR TO MONTH | Y | month_interval | PARSE_DURATION_MONTHS(column) |
| INTERVAL_DAY TO SECOND | Y | microsecond_interval | PARSE_DURATION_SECONDS(column) |
| TIMESTAMP | Y | datetime | PARSE_DATETIME_ISO8601(column) |
| TIMESTAMP WITH TIME ZONE | Y | datetime | PARSE_DATETIME('%Y-%m-%d %H:%M:%E*S %Ez', column) |
| TIMESTAMP WITH LOCAL TIME ZONE | Y | datetime | PARSE_DATETIME('%Y-%m-%d %H:%M:%E*S', column) |
| CHAR | Y | string | None |
| VARCHAR2 | Y | string | None |
| NCHAR | Y | string | None |
| NVARCHAR2 | Y | string | None |
| RAW | Y | bytes | FROM_HEX(SUBSTR(column, 3)) |
| REAL | Y | float | None |
Unsupported types:
- Large Object (LOB) Types: BLOB, CLOB, NCLOB, LONG, and LONG RAW
- XMLTYPE
- SDO_GEOMETRY
- BFILE
- ROWID
- REF
- UROWID
- ANYDATA
Limitations and Unsupported Operations
Rockset only supports tables with primary keys, and does not support Oracle Large Object (LOB) types.
Also, Rockset inherits a lot of the limitations imposed by Oracle replication and DMS. More notably:
- Partitioned and subpartition operations aren't replicated
- Update commands to primary keys aren't supported (e.g.
UPDATE Users SET ID=ID+1;)
Please review DMS documentation for more details.
Best Practices
We recommend only using one Kinesis stream per collection, i.e. one stream per Oracle table. If multiple collections read from the same Kinesis stream, they will encounter rate limits imposed by Kinesis, which results in throttling. When encountering throttling, Rockset retries with backoff, which can increase data ingestion latencies. Read more about the limits here.
If using one stream for multiple tables, please note the following:
- Any table exported to the stream must have the
idfield even if the tables are not included in any Rockset collection. - The Primary Key when creating a Rockset collection using the Kinesis stream must be the
idfield.
Updated 27 days ago